Spring is officially in her soft, pastel era and honestly, so are we.
If you’ve been craving a little creative reset, a cosy afternoon project, or an excuse to romanticise your living room with tulips and a glue gun, this is your sign. These easy Easter crafts are designed for real life. No advanced skills. No complicated tools. No five day commitment that ends in craft regret.
Every single idea in this post can be made in one afternoon. Think 2 to 4 hours, a good playlist, something sweet on the side, and that quiet satisfaction of making something beautiful with your own hands.
Inside you’ll find:
- Elegant Easter decor you’ll actually want to display
- Beginner friendly DIY projects
- Budget conscious ideas that look far more expensive than they are
- Crafts that double as gifts, table decor, or seasonal styling
Whether you’re decorating a small apartment, styling your Easter brunch table, refreshing your balcony, or simply choosing yourself for a slow creative Sunday, these projects fit perfectly into your life.
This is about more than pastel paint and bunny shapes. It’s about creating a home that feels intentional. About adding seasonal joy without clutter. About saying yes to a few hours of creativity just because you can.
So light a candle. Open the windows. Put on something that makes you feel like the main character.
Let’s make something beautiful.
1. DIY Ceramic-Style Painted Easter Eggs
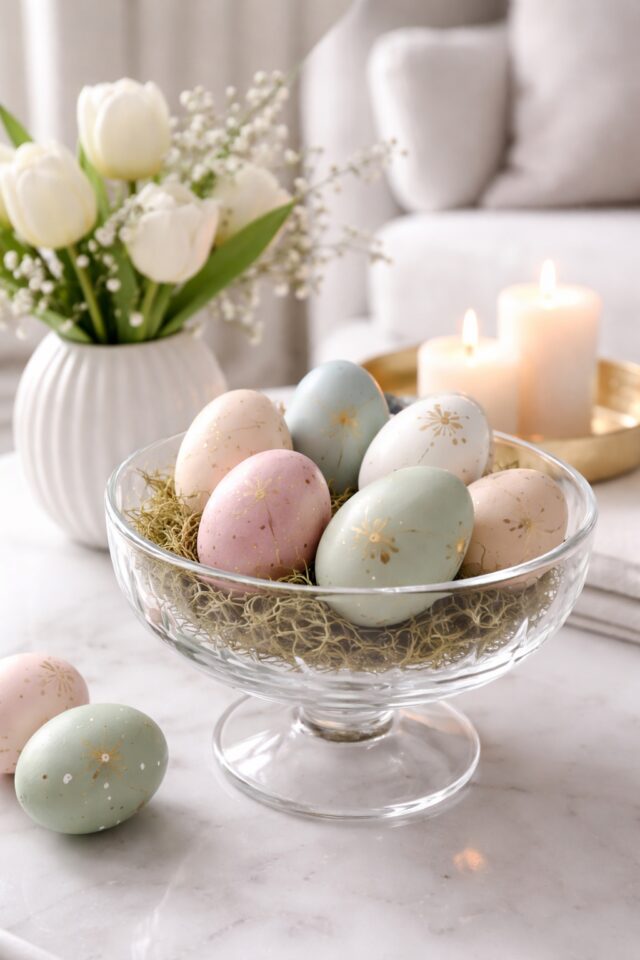
If you love that soft, boutique home decor look but do not love boutique prices, this one is for you.
These ceramic-style painted Easter eggs look like something you picked up from a chic interiors shop. In reality, you made them in your kitchen in under two hours. We adore a resourceful queen.
They are perfect for coffee table trays, open shelving, Easter brunch styling, or even tucked into a glass bowl for that effortless seasonal touch.
What You’ll Need
- Faux craft eggs
- Acrylic paint set in pastel colours
- Fine detail paint brushes
- Metallic gold acrylic paint
- Small egg holders or mini bowls
- Clear acrylic sealer spray
How To Make Them
- Start by placing your eggs on holders or small bowls so they stay steady while you paint.
- Apply a base coat in a soft pastel shade. Think blush, sage, powder blue, or creamy ivory. Let dry fully.
- Once dry, use a fine detail brush to add delicate patterns. Florals, abstract lines, tiny dots, or subtle swirls all work beautifully.
- For that elevated ceramic look, add small touches of metallic gold along edges or as thin accent lines. Keep it minimal for an elegant finish.
- When completely dry, lightly seal with a clear acrylic spray to give them a smooth, slightly glossy finish.
Styling Tip
Cluster three to five eggs in a glass bowl with moss or shredded paper for an effortless centrepiece. Or place them on a styled tray with candles and fresh flowers for that soft spring aesthetic.
These are the kind of Easter decorations you’ll want to reuse every year. Elegant. Intentional. Completely main character energy.
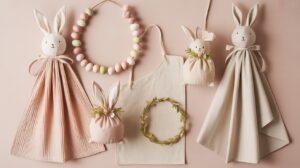
2. Mini Easter Bunny Garland
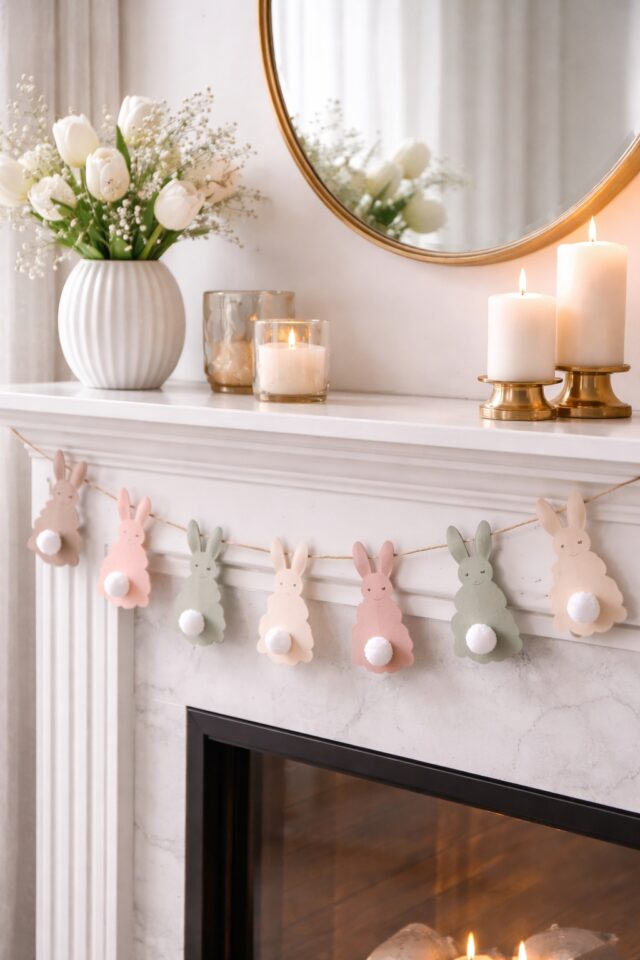
This one is playful, sweet, and dangerously easy to make.
A mini Easter bunny garland instantly adds that soft seasonal touch without overwhelming your space. It works beautifully across a mantel, draped over open shelving, styled along a mirror, or even across balcony doors if you are leaning into spring energy properly.
What You’ll Need
- Pastel or neutral cardstock paper
- Bunny craft template stencil
- Sharp craft scissors
- Natural twine or satin ribbon
- Mini pom poms for tails
- Hot glue gun and glue sticks
How To Make It
- Print or trace your bunny template onto the back of your cardstock.
- Cut out as many bunnies as you need. Usually 8 to 12 looks perfect for a standard mantel.
- Glue a mini pom pom onto each bunny for that fluffy tail detail. Let dry.
- Lay out your twine or ribbon and space your bunnies evenly along it.
- Secure each bunny to the string with a small dot of hot glue on the back.
- Leave a little extra string on each end for easy hanging.
You can keep it minimal with all one colour, or alternate soft blush, sage, cream, and powder blue for a gentle pastel moment.
Styling Tip
Drape your garland across a mantel layered with candles and a vase of tulips. For small spaces, hang it across open shelving above your coffee station for a subtle seasonal touch.
If you want to elevate it even further, weave delicate fairy lights through the twine for a soft evening glow.
It is simple, feminine, and makes your space feel intentionally styled without screaming Easter. Which is exactly the balance we are going for.
3. Pressed Flower Easter Candles
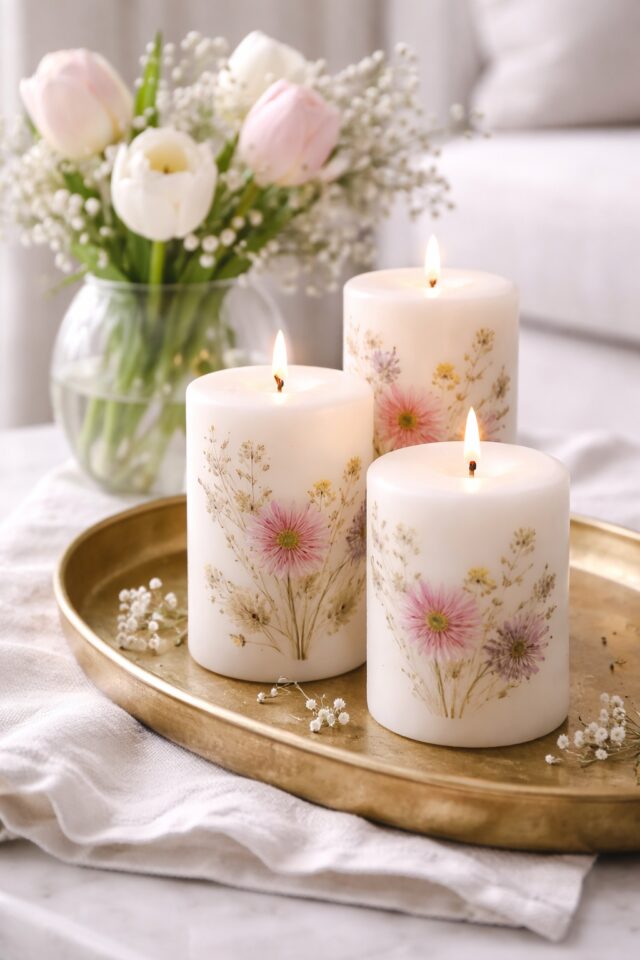
If your aesthetic leans soft, romantic, and quietly elegant, this one is going to feel very on brand.
Pressed flower candles are the definition of intentional living meets seasonal styling. They look delicate and elevated, yet they are surprisingly simple to create. Perfect for Easter brunch tables, bedside styling, or adding a subtle spring refresh to your living room.
What You’ll Need
- Plain white pillar candles
- Dried pressed flowers
- Tweezers for crafting
- Wax paper or parchment paper
- Hair dryer or heat tool
How To Make Them
- Make sure your candle surface is clean and dry.
- Using tweezers, carefully position your pressed flowers on the candle where you would like them.
- Place a piece of wax paper tightly over the flower and candle.
- Gently heat the area with a hair dryer. The wax will slightly melt and allow the flower to embed into the surface.
- Smooth over the wax paper with your fingers while warm to secure everything in place.
- Remove the wax paper and allow the candle to cool completely.
Work slowly and gently. This is not a rush project. It is a soft Sunday, windows open, playlist on kind of craft.
Safety Note
Keep flowers away from the wick area. For best results, use these candles as decorative styling pieces or burn them carefully under supervision.
Styling Tip
Style two or three pressed flower candles together on a tray with a linen runner and fresh tulips. They also look beautiful on a bedside table or styled beside a stack of books for that quiet spring reset moment.
They are feminine, elegant, and just different enough to make people ask where you bought them.
And you get to casually say, I made them.
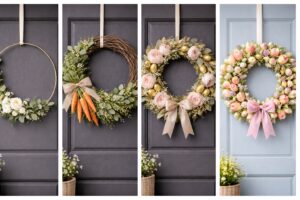
4. Easter Wreath with Faux Florals
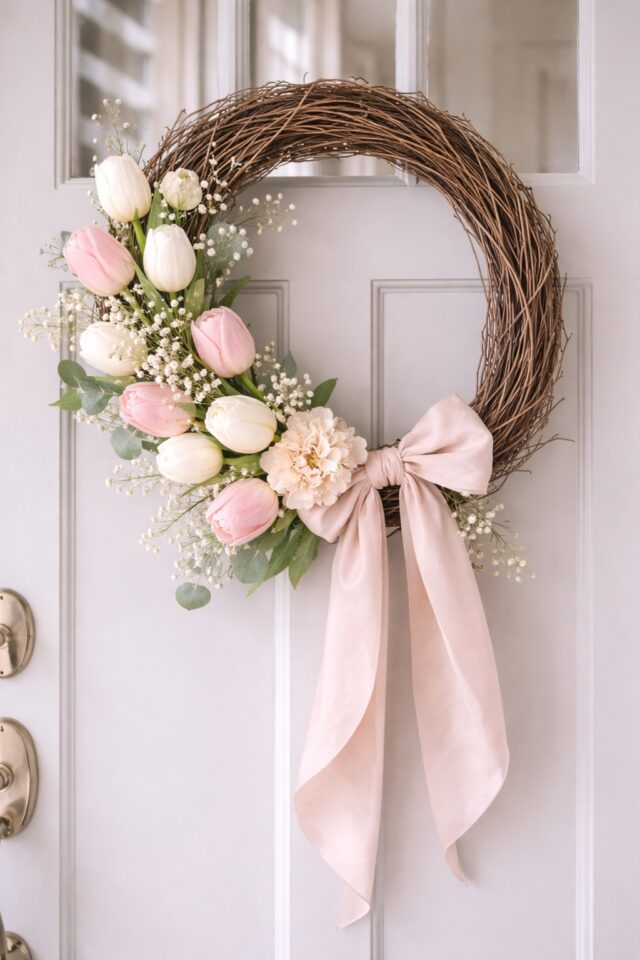
Nothing says “I have my life together” quite like a beautiful front door wreath.
This Easter wreath is soft, elegant, and intentionally styled. No loud plastic eggs. No chaotic colour overload. Just feminine spring energy that feels polished and welcoming.
What You’ll Need
- Grapevine wreath base
- Faux tulips or spring florals
- Floral wire
- Wire cutters
- Soft satin or linen ribbon
- Hot glue gun and glue sticks
How To Make It
- Start by trimming your faux florals into smaller stems using wire cutters.
- Lay them on the wreath base first without attaching anything. Play with placement until it feels balanced.
- For a modern look, cluster flowers asymmetrically on one side rather than going all the way around.
- Secure each stem with floral wire wrapped tightly around the wreath base.
- Add a few small dots of hot glue for extra stability if needed.
- Finish with a soft ribbon tied at the bottom or top for a subtle feminine detail.
Step back occasionally while you work. If it looks effortless, you are doing it right.
Styling Tip
Hang it on your front door for instant curb appeal, or style it indoors above a console table or fireplace for apartment friendly living.
Keep the colour palette soft. Blush, cream, sage, and pale yellow always feel timeless. You want it to whisper spring, not shout Easter.
It is elegant. It is intentional. And yes, you absolutely made it yourself.
5. Speckled Easter Egg Planters

This one is for the small space queens and balcony garden girls.
Speckled Easter egg planters are minimal, modern, and just a little bit playful. They feel seasonal without being overly themed, which means you can keep them styled well beyond Easter.
What You’ll Need
- Small terracotta pots
- Acrylic paint in soft pastel shades
- Small paint brushes
- Old toothbrush for speckle effect
- Mini succulents or herbs
- Clear acrylic sealer spray
How To Make Them
- Start by painting your terracotta pots in a base pastel colour. Soft sage, blush, butter yellow, or powder blue work beautifully.
- Allow the base coat to dry fully.
- Dip an old toothbrush into a slightly darker paint colour.
- Hold the brush over the pot and gently flick the bristles with your thumb to create a natural speckled effect.
- Let everything dry completely before sealing with a light coat of acrylic spray.
- Once sealed and dry, plant your succulents or herbs inside.
The speckling does not need to be perfect. In fact, imperfect makes it look more organic and elevated.
Styling Tip
Group three planters together on a kitchen windowsill, balcony shelf, or coffee table tray. Mix slightly different pastel shades for that curated but effortless look.
You can even plant fresh herbs and use them for spring cooking. Decor and functionality? We love a practical aesthetic moment.
It is fresh. It is modern. It is exactly the kind of DIY that makes your space feel thoughtfully styled without spending a fortune.
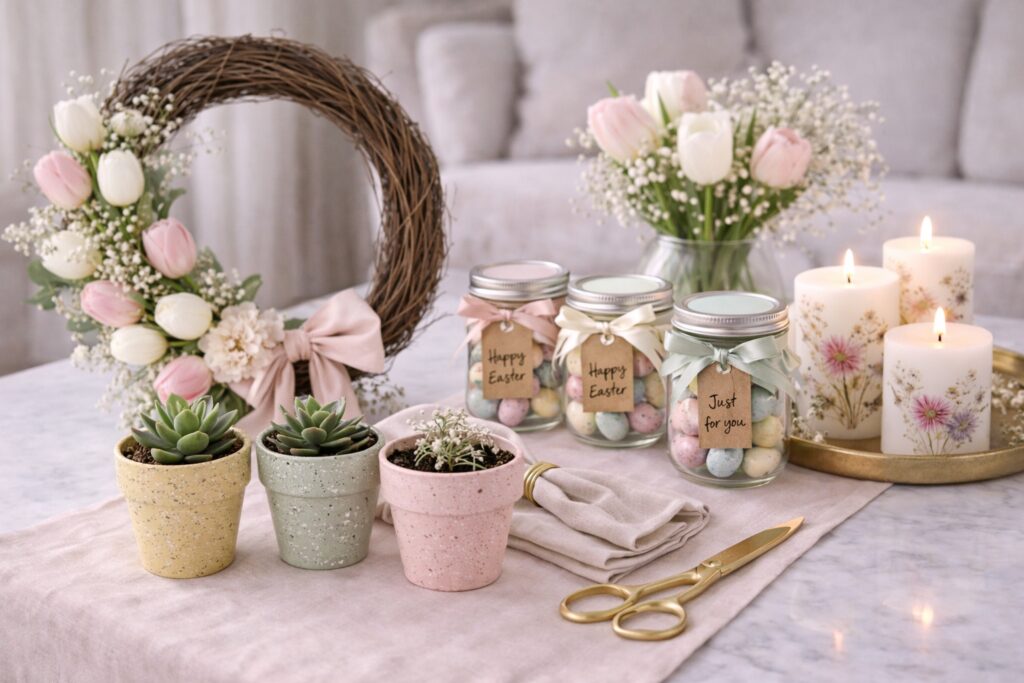
6. Easter Gift Jars with Mini Treats
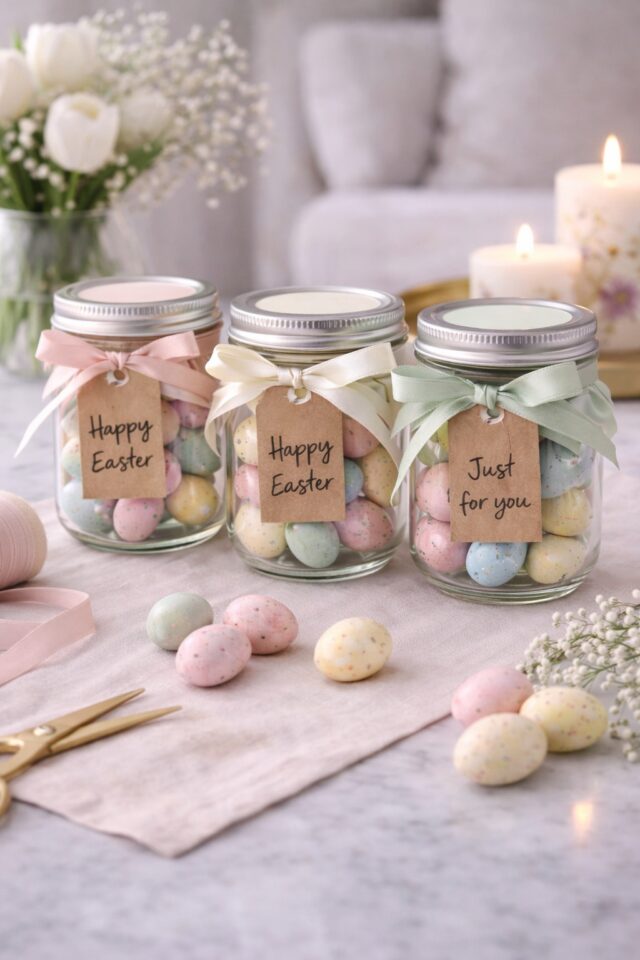
This is your “I am thoughtful and organised” craft.
Easter gift jars are simple, affordable, and look beautifully curated. They are perfect as Easter brunch place settings, little neighbour gifts, or just a sweet surprise for someone you love. Including yourself. We absolutely count.
This one sits perfectly in Seasonal and Romanticise Your Life territory on Pinterest The_Single_Diva_Categories_and_… The_Single_Diva_Updated_Brand_G…
What You’ll Need
- Small glass jars with lids
- Mini chocolate eggs
- Pastel tissue paper
- Decorative ribbon
- Printable kraft gift tags
- Fine tip marker pen
How To Make Them
- Line the inside of each jar lid with a small circle of pastel tissue paper for a soft layered look.
- Fill the jar with mini chocolate eggs or pastel sweets. You can mix colours or keep it tonal for a more elevated aesthetic.
- Screw the lid on tightly.
- Tie a ribbon around the neck of the jar in a neat bow.
- Write a short message on the gift tag and attach it to the ribbon.
Keep the colour palette cohesive. If you choose blush and cream, stick with it. If you go for soft sage and ivory, commit to that vibe. The secret to looking styled rather than crafty is consistency.
Styling Tip
Use them as place settings at your Easter table. Simply place one jar on each plate with a linen napkin underneath.
They also look beautiful styled in a group of three on a kitchen counter or coffee table tray.
Small effort. Big impact.
And honestly, there is something very satisfying about handing someone a gift and casually saying, I made this.
7. Pastel Easter Table Runner No Sew Option
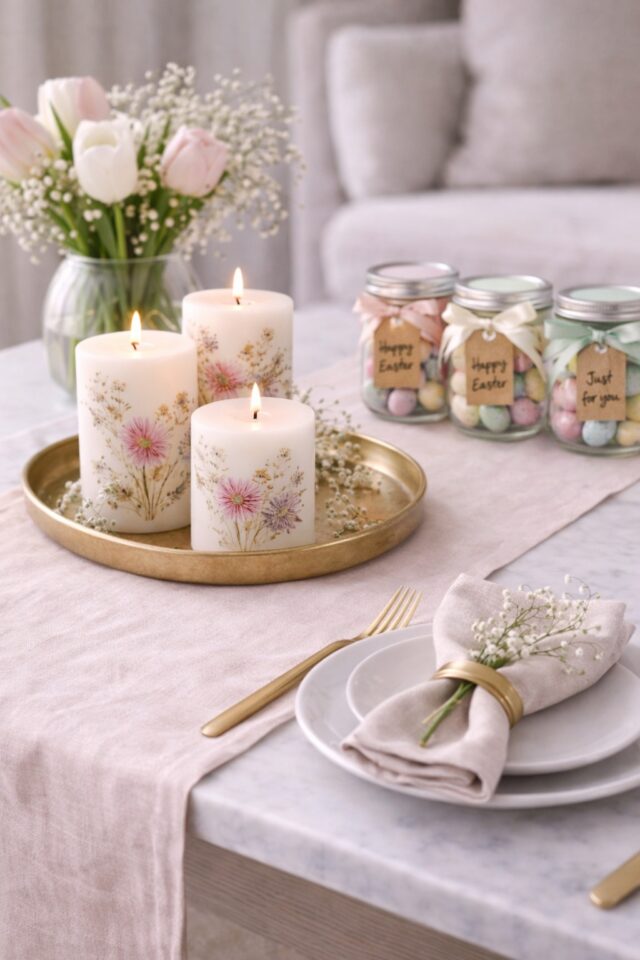
If you want your Easter table to look like it belongs on Pinterest but you do not own a sewing machine, this is your moment.
A soft pastel table runner instantly elevates your dining table, kitchen island, or even a console table. It creates that layered, intentional look that makes everything else on the table feel styled rather than placed.
What You’ll Need
- Pastel linen or cotton fabric
- Fabric scissors
- Iron and ironing board
- Fabric glue or hemming tape
- Measuring tape
How To Make It
- Measure the length of your table and decide how much overhang you would like on each side.
- Cut your fabric to size using sharp fabric scissors for clean edges.
- Fold each edge over about 1 to 2 centimetres and press with an iron to create a crisp line.
- Apply fabric glue or hemming tape inside the fold and press firmly to secure.
- Allow to dry fully before placing it on your table.
Choose a soft blush, pale sage, butter yellow, or even classic cream. The key is to keep it subtle and elegant so it complements everything else.
Styling Tip
Layer your new runner with pressed flower candles, fresh tulips, and your Easter gift jars from earlier. Add neutral plates, linen napkins, and a few gold accents for that polished finish.
The beauty of this craft is that it is reusable. Once Easter is over, keep the runner and style it throughout spring.
It is simple. It is chic. And it makes your whole table look like you absolutely planned this.
Bonus: Turn It Into a Full Easter Reset Afternoon
Now that you have seven beautiful crafts to choose from, let’s elevate this.
Do not rush through them like a task list. Make it a moment.
Set the scene:
- Open the windows and let fresh spring air in
- Light one of your pressed flower candles
- Put on a playlist that makes you feel calm and confident
- Make a coffee, matcha, or something bubbly
- Put your phone on silent
This is not just about decor. This is about choosing yourself for a few uninterrupted hours. Creating beauty in your space. Slowing down on purpose.
Crafting can genuinely feel like a reset. You focus on something small and tactile, and suddenly your mind feels clearer too. It is the soft life energy we are fully leaning into this season.
You are not just decorating for Easter.
You are creating a home that reflects you.
How to Make These Crafts Look Expensive
Because we are not doing “cute but chaotic.”
Here are a few quick tips to elevate everything:
- Stick to one soft colour palette
- Choose quality over quantity when styling
- Leave negative space around decor pieces
- Group items in odd numbers
- Mix textures like linen, glass, metal, and florals
The difference between “DIY” and “designer” is usually restraint.
You do not need more. You need intention.
Final Thoughts
You do not need an entire weekend.
You do not need advanced skills.
You do not need a craft room.
You need one afternoon, a few supplies, and a little intention.
Whether you make the painted eggs, the wreath, the gift jars, or all of them because you are that girl, each project adds a soft seasonal layer to your space.
And that is what this is really about.
Creating a life that feels beautiful in the everyday moments.
Decorating because it brings you joy.
Making things with your own hands just because you can.
If you loved this post, save it to your Seasonal or DIY boards on Pinterest so you can come back to it next year. And tell me in the comments, which one are you making first?
I already know your Easter decor is about to look very put together.