If you’ve been searching for Easter egg decorating ideas for adults that feel elegant instead of elementary school, you are in exactly the right place. This is not about neon dyes and cartoon stickers. This is about elevated, aesthetic Easter decor that looks like it belongs on a beautifully styled brunch table or in a thoughtfully curated home.
Easter is the perfect excuse to lean into creativity in a way that feels calm, feminine, and intentional. Whether you are hosting brunch, decorating your apartment for spring, or simply craving a mindful Sunday craft session, chic Easter egg decorating can become a ritual rather than a rushed activity. Think soft neutrals, gold accents, delicate botanicals, and modern minimalist details that feel grown up and refined.
These elegant Easter egg decorating ideas are designed for women who love beautiful interiors, romanticised routines, and seasonal styling with taste. Each idea is simple enough to create in one afternoon, but polished enough to elevate your entire Easter aesthetic. From modern monochrome designs to luxe gold leaf finishes, you’ll find inspiration that works for small space living, stylish tablescapes, and Instagram worthy spring decor.
If you’re ready to swap loud colours for soft sophistication and turn Easter into a creative self care moment, these chic Easter egg decorating ideas for adults will inspire you to choose style, intention, and just a little bit of seasonal glamour.
1. Minimalist Neutral Easter Eggs
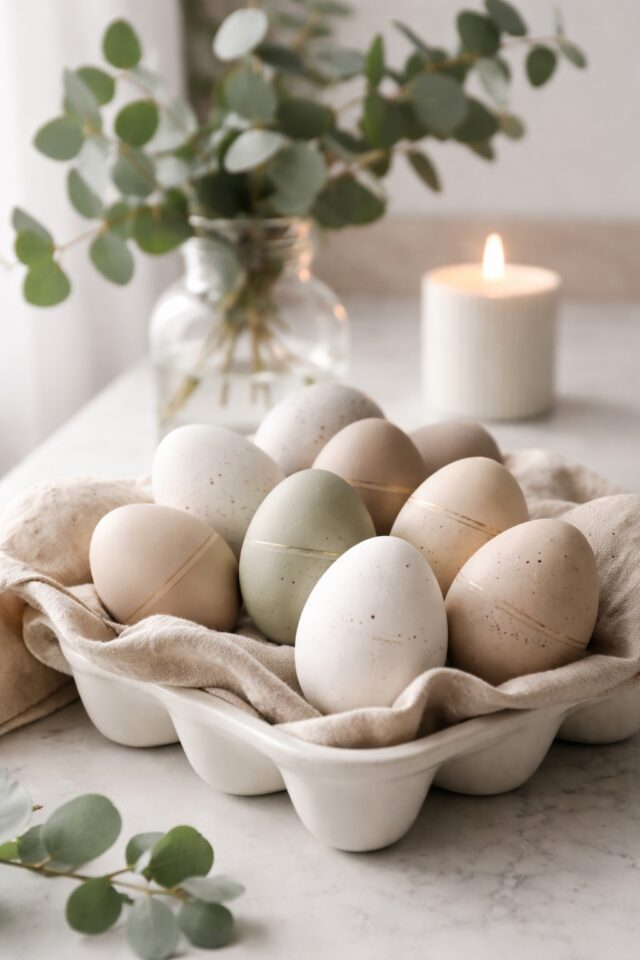
If your aesthetic leans soft, calm, and effortlessly put together, minimalist neutral Easter eggs are your moment. This is the grown woman version of egg decorating. Think matte finishes, muted tones, and styling that looks like it belongs in a Scandinavian inspired brunch setup.
These are perfect if you love beige kitchens, linen table runners, and that whole romanticised Sunday reset energy.
What You’ll Need
- White blown eggs or craft eggs
- Matte acrylic paint set in neutral tones
- Small flat paint brushes
- Fine detail paint brush
- Matte clear sealant spray
- Ceramic egg holder tray
How to Create the Look
- Start by choosing a tight colour palette. Stick to 3 to 4 shades like ivory, taupe, warm grey, soft sage, or blush beige. Restraint is what makes this look expensive.
- Paint each egg in a solid matte shade. Apply two thin coats rather than one thick one. Let them dry fully between layers.
- For a subtle speckled effect, dip a toothbrush into watered down darker paint and gently flick it over the egg. Keep it delicate. You want quiet texture, not chaos.
- If you’re feeling extra polished, add a single thin line around the middle of the egg in a slightly deeper neutral using a fine brush.
- Finish with a light coat of matte sealant to give everything that smooth, velvety finish.
Styling Tip
Place your finished eggs in a ceramic tray or shallow bowl lined with crumpled linen. Add a few sprigs of eucalyptus or olive branches for that effortless, editorial look. This is the kind of Easter decor that whispers taste instead of shouting theme.
Minimal. Elevated. Completely adult.
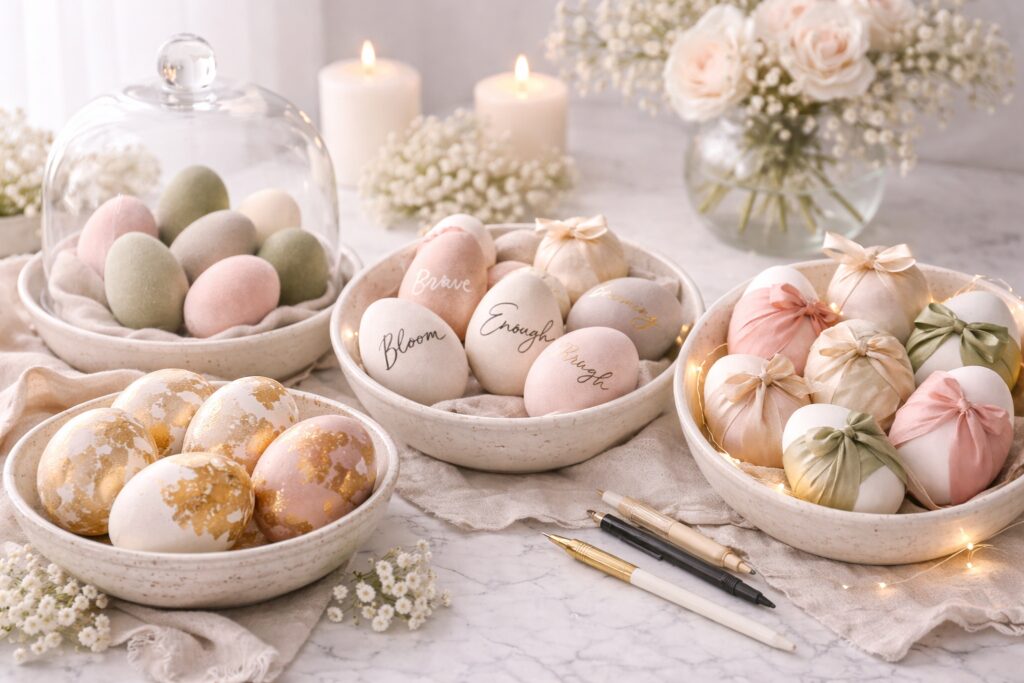
2. Gold Leaf Luxe Easter Eggs
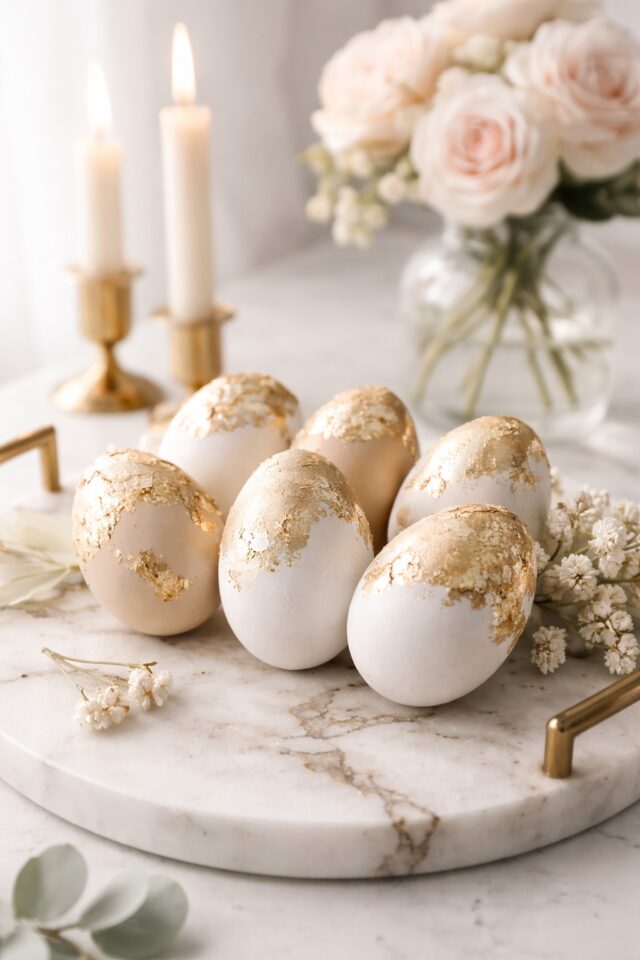
If minimalist is quiet luxury, this is champagne energy. Gold leaf Easter eggs are bold in the most refined way. They catch the light, elevate your entire tablescape, and instantly make it clear that you did not come here to play with plastic grass.
This look is perfect for brunch hosting, a styled coffee table moment, or simply adding a little drama to your spring decor.
What You’ll Need
- White blown eggs or wooden craft eggs
- Gold leaf sheets or flakes
- Gold leaf adhesive size
- Soft flat paint brush
- Small detail brush
- Clear satin sealant spray
- Marble or stone serving tray
How to Create the Look
- Start with clean, dry eggs. You can leave them white for a crisp contrast or paint them in a soft blush or taupe first for a warmer finish.
- Using a small brush, apply adhesive in organic shapes. Think abstract brush strokes, torn edge lines, or a half dipped effect. Do not aim for perfection. The irregularity is what makes it look designer.
- Once the adhesive becomes tacky, gently press the gold leaf onto the surface. Use a soft brush to smooth and remove excess flakes.
- Let everything dry fully before lightly sealing with a satin finish spray. This protects the leaf and gives it a subtle glow without making it overly glossy.
Styling Tip
Cluster three to five eggs on a marble tray with taper candles and soft florals. Keep the surrounding decor neutral so the gold can shine. This is a less is more moment. Let the metallic detail do the talking.
Elegant. Intentional. A little bit extra in the best way.
3. Marble Effect Easter Eggs

If you love a high end kitchen aesthetic and anything that looks like it belongs on a Carrara countertop, marble effect Easter eggs are your girl. They feel artistic, modern, and slightly dramatic without trying too hard.
Each egg turns out completely unique, which makes this one of those crafts that feels creative and elevated at the same time.
What You’ll Need
- White blown eggs or hard boiled eggs
- Nail polish in soft neutrals or monochrome shades
- Disposable cups or bowls
- Wooden skewers or cocktail sticks
- Latex gloves
- Paper towels
- Clear gloss sealant spray
How to Create the Look
- Fill a disposable cup with room temperature water. Add a few drops of nail polish on the surface. Layer two or three shades for depth. Think white with taupe, blush with cream, or classic black and white.
- Use a skewer to gently swirl the polish. Do not overmix. You want soft veining, not mud.
- Wearing gloves, dip the egg slowly into the water, rolling slightly to pick up the marbled pattern.
- Lift it out carefully and place it on paper towels to dry. Each one will look different, which is exactly the point.
- Once fully dry, add a light coat of gloss sealant to enhance the marble shine.
Styling Tip
Photograph or display these on an actual marble surface for maximum impact. Pair with simple white florals and minimal decor so the pattern stands out. This is modern Easter with taste, not clutter.
4. Dried Flower Botanical Easter Eggs
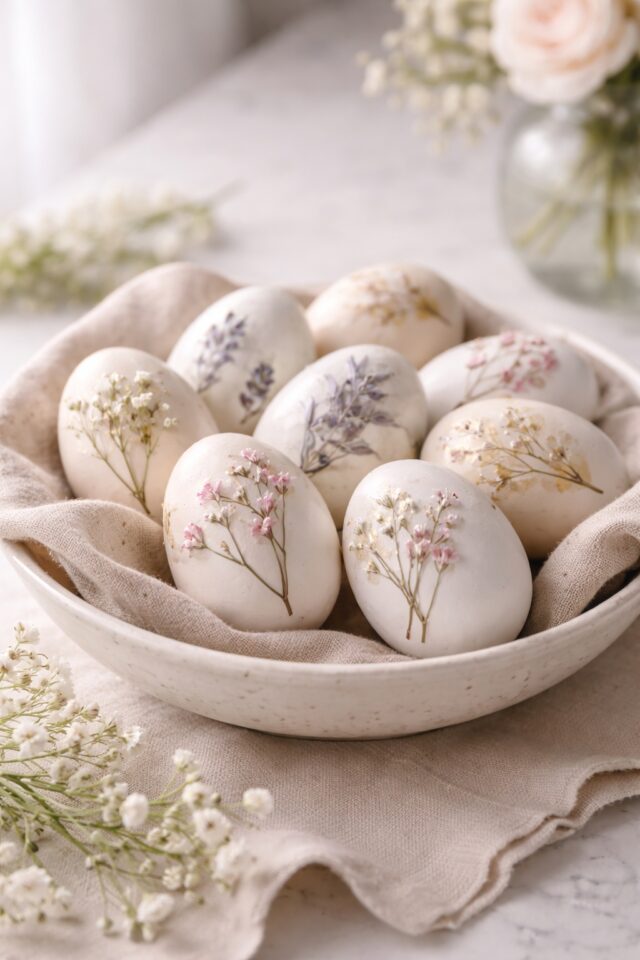
If you love anything that feels like a romantic spring morning in the countryside, botanical eggs are your moment. These are delicate, feminine, and quietly stunning. They look like something you would find styled on a linen covered table with fresh tulips and good coffee.
This design feels soft but intentional. Very grown woman. Very curated.
What You’ll Need
- White blown eggs or wooden craft eggs
- Assorted dried pressed flowers
- Mod Podge matte sealer
- Small soft paint brush
- Tweezers for crafting
- Matte clear sealant spray
- Linen table runner or napkins
How to Create the Look
- Start with clean eggs in a soft base shade. You can leave them white or paint them in a pale blush or cream for extra warmth.
- Using a small brush, apply a thin layer of Mod Podge to a small section of the egg.
- Carefully place a pressed flower onto the adhesive using tweezers. Smooth it gently so it lies flat against the surface.
- Once positioned, lightly brush another thin layer of Mod Podge over the top to seal it. Work slowly and gently to avoid tearing delicate petals.
- Allow the eggs to dry fully before finishing with a soft matte sealant spray.
Styling Tip
Display these in a shallow bowl lined with linen or scatter them down the centre of your brunch table. Pair with fresh florals in similar tones so everything feels cohesive. Keep the palette soft and restrained for that effortlessly elegant finish.
Romantic. Refined. A little bit poetic.
5. Black and White Modern Easter Eggs
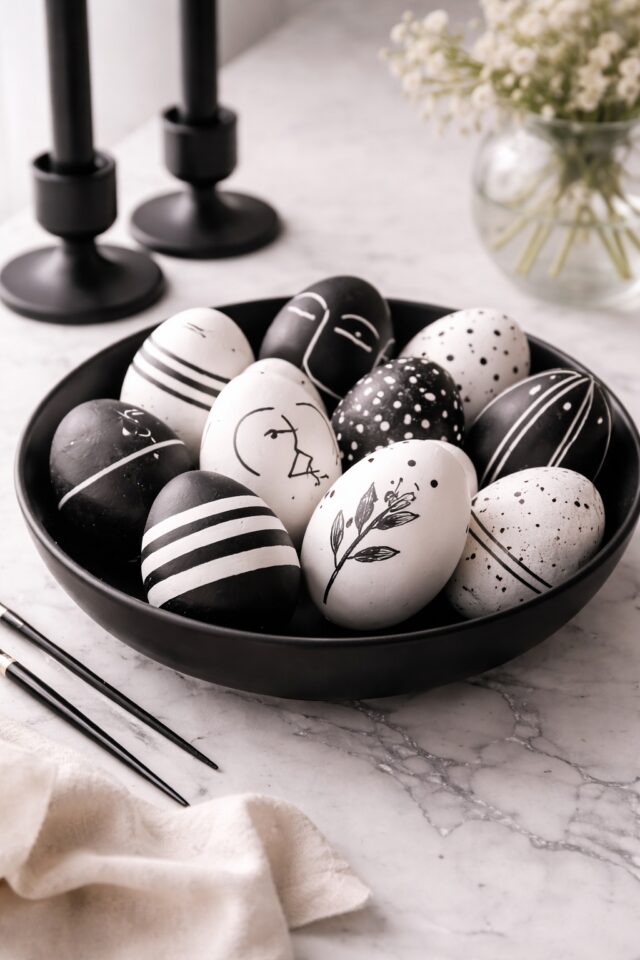
If your style leans clean, graphic, and slightly dramatic, this one is for you. Black and white Easter eggs feel bold, artistic, and unapologetically modern. No pastels. No fuss. Just confident contrast.
This look is perfect for anyone who loves a monochrome interior, structured silhouettes, and decor that feels curated rather than crowded.
What You’ll Need
- White blown eggs or wooden craft eggs
- Matte black acrylic paint
- Matte white acrylic paint
- Fine line paint brushes
- Black paint marker
- Matte clear sealant spray
- Minimalist black candle holders
How to Create the Look
- Paint half your eggs matte black and leave the others white for contrast. Apply two thin coats and allow them to dry completely.
- On the black eggs, use white paint or a paint marker to create simple line art. Think abstract faces, delicate stripes, scattered dots, or thin horizontal bands.
- On the white eggs, reverse it. Use black paint to add minimal geometric shapes or subtle brush strokes.
- Keep the designs simple and restrained. Negative space is your best friend here.
- Finish with a matte sealant to keep everything smooth and cohesive.
Styling Tip
Style these on a crisp white table with black taper candles or in a shallow black bowl for a strong focal point. Keep the surrounding decor neutral so the contrast remains sharp and intentional.
Modern. Confident. Slightly edgy in the most elegant way.
6. Velvet Texture Easter Eggs
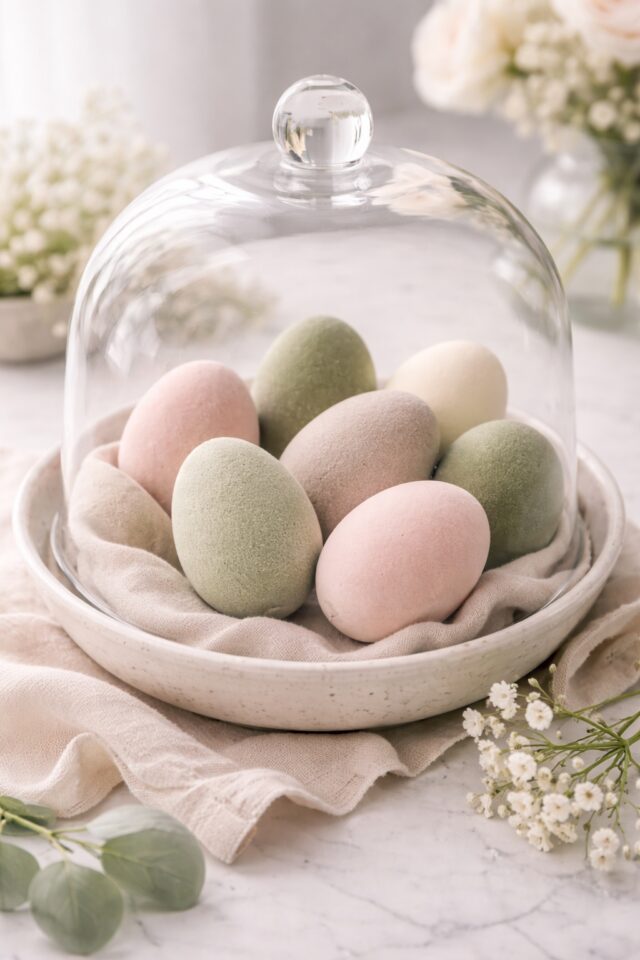
If soft luxury is your thing, velvet texture eggs are about to become your new obsession. They look expensive, feel indulgent, and instantly elevate even the simplest Easter setup.
This is the kind of detail that makes guests lean in and say, wait… are those velvet?
What You’ll Need
- Wooden or plastic craft eggs
- Acrylic paint in blush, sage, cream, or taupe
- Flocking powder in coordinating shades
- Craft glue or adhesive spray
- Soft paint brush
- Disposable tray or box for excess powder
- Glass cloche or decorative dome
How to Create the Look
- Start by painting your eggs in a shade that matches your flocking powder. This ensures a seamless finish if any tiny areas show through.
- Once the paint is fully dry, apply an even layer of craft glue or adhesive spray over the entire egg.
- Hold the egg over a tray and generously sprinkle flocking powder on top. Rotate slowly so every section is coated.
- Gently tap off the excess powder and allow the egg to dry completely before handling.
- For a more sculptural look, try half velvet and half matte paint for subtle contrast.
Styling Tip
Display your velvet eggs under a glass cloche or in a shallow bowl layered with soft linen. Keep the colour palette muted and cohesive so the texture becomes the hero.
Touchably chic. Understated. Very soft life, but make it elevated.
7. Calligraphy Quote Easter Eggs
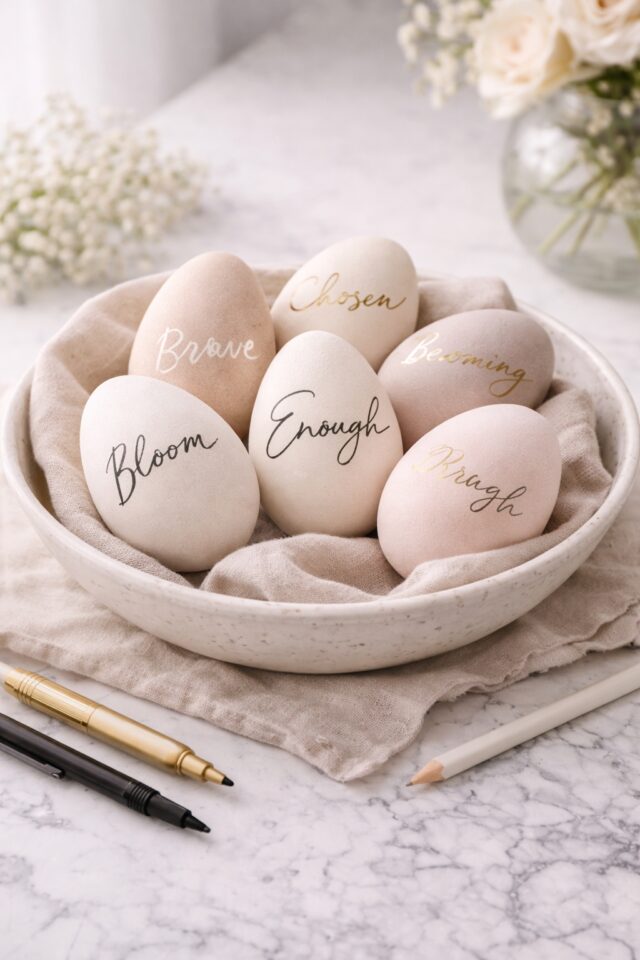
If you love meaningful details and intentional decor, calligraphy eggs are where creativity meets confidence. These are subtle, personal, and just a little bit powerful. Instead of patterns, you are adding words that reflect who you are and what you are stepping into this season.
Think less cutesy slogans, more quiet affirmations.
What You’ll Need
- White blown eggs or painted neutral eggs
- Fine tip black paint marker
- Gold paint pen
- Pencil for light sketching
- Lettering practice guide book
- Matte clear sealant spray
- Decorative ceramic bowl
How to Create the Look
- Start with eggs painted in soft neutrals like cream, blush, or warm white. Let them dry fully.
- Lightly sketch your word in pencil first. Keep it simple. One word per egg feels intentional and chic.
- Trace over your lettering with a fine paint marker or gold pen. Slow, steady strokes. This is your calm creative moment.
- Popular words to try: Bloom, Enough, Chosen, Soft, Brave, Becoming.
- Once the ink is completely dry, seal lightly with a matte spray to protect the design.
Styling Tip
Scatter these along your Easter table or place one at each setting as a thoughtful detail. They double as decor and a subtle conversation starter. Keep everything else minimal so the words feel powerful, not busy.
Personal. Meaningful. Confident in the quietest way.
8. Silk Ribbon Wrapped Easter Eggs
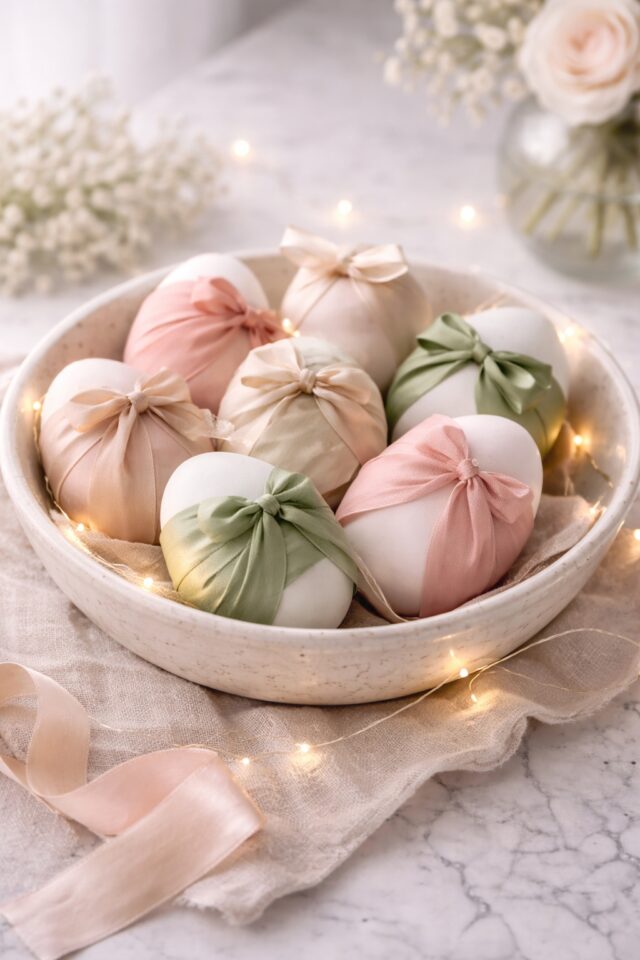
If you adore feminine details and timeless textures, silk ribbon wrapped eggs are pure elegance. They feel delicate, romantic, and beautifully styled without needing paint or patterns.
This is effortless chic. The kind of Easter decor that looks like it belongs in a softly lit Parisian apartment.
What You’ll Need
- Wooden or plastic craft eggs
- Raw silk ribbon in blush, sage, champagne, or ivory
- Mini pearl pins
- Small craft scissors
- Double sided craft tape
- Shallow decorative bowl
- Warm white fairy lights
How to Create the Look
- Cut a length of silk ribbon long enough to wrap around the egg with a slight overlap.
- Secure one end of the ribbon at the base using a small piece of double sided tape.
- Gently wrap the ribbon around the egg, keeping it smooth and slightly angled for a soft layered effect.
- Finish by securing the end underneath with tape or a discreet pearl pin for a decorative touch.
- For extra detail, tie a tiny bow at the top or leave the ribbon trailing slightly for a relaxed, romantic feel.
Styling Tip
Arrange your ribbon wrapped eggs in a shallow bowl and weave in a few warm fairy lights for a soft glow. Keep everything tonal and cohesive. When the palette flows, the whole setup feels intentional and elevated.
Soft. Feminine. Understated in the most beautiful way.
A refined seasonal touch that feels thoughtful and styled with purpose while aligning perfectly with a confident, elegant brand energy.
Make It a Ritual, Not Just a Craft
Now that you’ve chosen your aesthetic, this is your reminder to slow it down. Easter egg decorating does not have to be chaotic or rushed. It can be a soft, intentional moment that feels like you are choosing yourself.
Light a candle. Put your phone on silent. Pour a glass of something chilled or brew your favourite coffee. Turn it into a creative reset rather than another thing on your to do list.
How to Elevate the Experience
- Set up a clear workspace with everything laid out beautifully
- Stick to one cohesive colour palette instead of mixing styles
- Play calming music or a podcast that makes you feel inspired
- Take your time. There is no prize for finishing first
When you treat decorating as a ritual, the end result always looks more refined. You are not just crafting. You are curating.
Hosting Idea
If you want to make it social, invite a few friends over for a chic Easter craft brunch. Keep the food simple and the decor cohesive. Everyone chooses one design style and commits to it. No glitter chaos allowed.
Styling the Final Look
Once your eggs are finished, style them intentionally. Group in odd numbers. Keep surrounding decor minimal. Repeat colours throughout your table or shelf so everything feels connected.
Easter decor can be playful, but it can also be elegant, confident, and beautifully grown up. When you choose details that reflect your personal style, the whole space feels aligned and elevated while staying true to a polished, empowering energy.
Final Thoughts: Elegant Easter, Your Way
The beauty of these chic Easter egg decorating ideas for adults is that none of them feel childish or overdone. They feel styled. Considered. Intentional.
And that is the whole point.
Whether you choose minimalist neutrals, romantic botanicals, bold monochrome, or soft velvet textures, commit to one aesthetic and let it shine. Cohesion is what makes everything look elevated. When your colour palette flows and your details feel curated, your Easter decor instantly looks more refined.
A Quick Styling Rule to Remember
- Choose one dominant texture
- Stick to a tight colour palette
- Repeat one accent throughout the space
- Leave breathing room around your decor
Negative space is chic. Overcrowding is not.
Most importantly, let this be a reflection of your personal style. Easter decor does not have to look like anyone else’s Pinterest board. It should feel like your home, your energy, your taste.
Confident. Feminine. Intentionally styled and completely aligned with a polished, empowering approach to seasonal living.
Now go choose your favourite design and make it beautiful.