These little bites taste like a peanut butter cup with a creamy center and a snappy chocolate shell, but they’re even easier to make. No oven, no candy thermometer, and no fuss. Just stir, shape, chill, and coat.
They’re perfect for holidays, school treats, or when you want something sweet without turning on the stove. Make a batch today and stash them in the fridge for quick desserts all week.
Why This Recipe Works
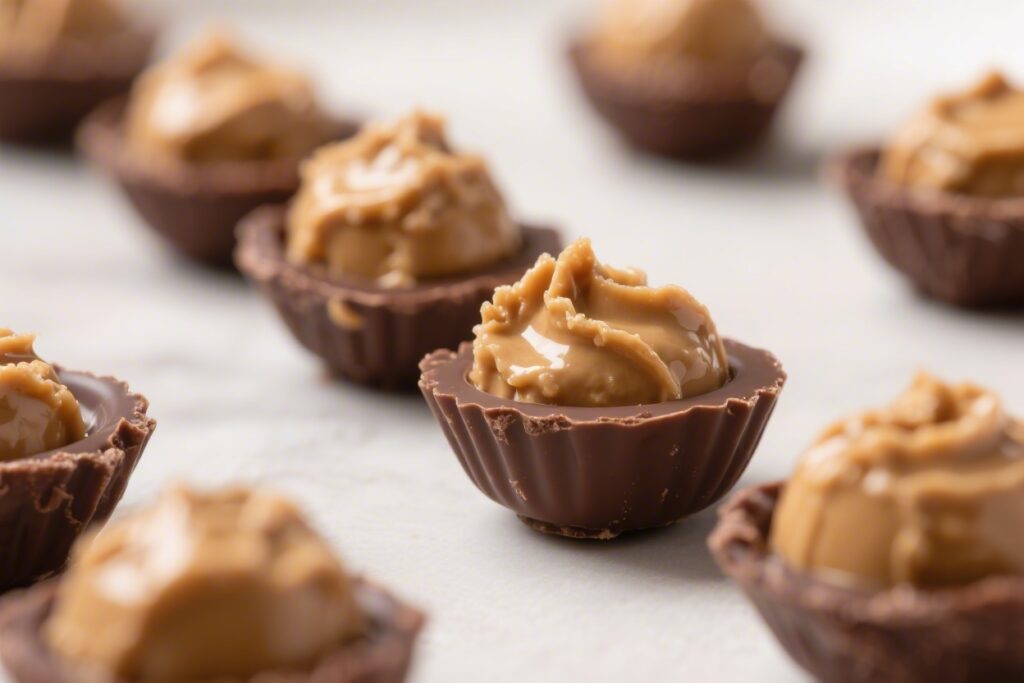
These egg-shaped bites rely on a simple mix of peanut butter, butter, powdered sugar, and a hint of vanilla to create a smooth, scoopable filling. The butter helps the peanut butter set up for clean bites that don’t ooze.
Powdered sugar adds sweetness and body without graininess.
The chocolate shell comes from melted chocolate chips and coconut oil. The oil thins the chocolate for easier dipping and gives a glossy finish with a gentle snap. A quick chill between shaping and dipping keeps the bites sturdy and easy to handle, so you get neat, professional-looking results at home.
Storage Instructions
- Refrigerator: Store in an airtight container for up to 2 weeks. Separate layers with parchment to prevent sticking.
- Freezer: Freeze for up to 2 months.
Thaw in the fridge for 30–45 minutes before serving, or enjoy slightly chilled for extra snap.
- Room temperature: Safe for a few hours at normal room temps, but they soften if it’s warm. Keep them chilled for the best texture.
Benefits of This Recipe
- No baking required: Great for hot days, small kitchens, or when you just don’t want to heat the oven.
- Fast and forgiving: The filling comes together in minutes, and the rest is simple assembly.
- Kid-friendly: Children can help shape, decorate, and taste-test. Minimal mess if you line your surfaces.
- Customizable: Adjust sweetness, chocolate type, and add mix-ins or toppings to fit your taste.
- Make-ahead: Holds up beautifully in the fridge or freezer for easy entertaining.
What Not to Do
- Don’t skip chilling: Warm filling will slide off your fork and make streaky coatings.
- Don’t overheat the chocolate: Burnt chocolate seizes and turns grainy.
Melt low and slow, stirring often.
- Don’t use only natural peanut butter without adjustments: It’s oilier and may not set. See Variations for fixes.
- Don’t rush the set time: Let the chocolate fully firm up to avoid fingerprints and smudges.
- Don’t skip the pinch of salt: A little salt brightens the peanut butter and keeps the sweetness in check.
Recipe Variations
- Using natural peanut butter: Stir well to incorporate the oil. Add an extra 2–4 tablespoons powdered sugar or 2–3 tablespoons finely ground oats or almond flour to help the filling firm up.
- Crunchy center: Fold in 1/3 cup crushed peanuts, crispy rice cereal, or crushed cornflakes for texture.
- Different nut or seed butters: Try almond butter, cashew butter, or sunflower seed butter for a nut-free option.
Adjust powdered sugar to reach a moldable consistency.
- Flavor twists: Add 1/2 teaspoon espresso powder to the chocolate for mocha vibes, or 1/2 teaspoon cinnamon or a tiny splash of maple extract to the filling.
- Health-leaning swap: Replace some powdered sugar with 2–3 tablespoons coconut flour to reduce sweetness while keeping structure. Taste and adjust.
- White or milk chocolate shell: Swap the chocolate type to match your preference. Reduce or skip added oil with milk chocolate if it’s already quite fluid.
- Decor ideas: Drizzle contrasting chocolate, add pastel sprinkles for spring, or press on a few mini chocolate chips before the shell sets.
FAQ
Can I make these without butter?
Yes.
Increase the peanut butter slightly and add a tablespoon or two of coconut oil to help the filling set. You may need a bit more powdered sugar to keep the texture firm and not sticky.
How do I avoid thick, gloppy chocolate when dipping?
Use a teaspoon of oil to thin the chocolate and work with chilled centers. Tap the fork gently on the bowl to let excess drip off.
If the chocolate cools and thickens, re-warm it in short bursts and stir until glossy again.
Why are my bites cracking after coating?
The centers were likely too frozen, and the warm chocolate contracted as it set. Let the shaped centers sit at room temp for 3–5 minutes after freezing so the temperature difference isn’t extreme.
Can I sweeten with honey or maple syrup instead of powdered sugar?
Liquid sweeteners make the filling looser. If you use them, add only a small amount and balance with a dry binder like coconut flour, almond flour, or finely ground oats until the mixture is moldable.
What’s the best way to shape them like eggs?
Roll each portion into an oval, then pinch one end slightly to create a gentle point.
If your hands get sticky, chill the mixture or lightly oil your palms for smoother shaping.
Do I need to temper the chocolate?
No. Because these are stored chilled, simple melted chocolate with a bit of oil works great. If you want a room-temp stable snap, you can temper, but it’s not necessary for this recipe.
How can I make them gluten-free or dairy-free?
They’re naturally gluten-free if all ingredients are certified.
For dairy-free, use a vegan butter or refined coconut oil in the filling and dairy-free chocolate for the shell.
Can I double the recipe?
Absolutely. Work in batches when dipping so the centers stay chilled. Rewarm chocolate as needed to keep it smooth.
Why is my filling crumbly?
It likely has too much powdered sugar.
Work in a spoon of peanut butter or a small splash of milk to bring it back to a smooth, moldable texture.
How do I get a thicker chocolate shell?
Dip twice. Let the first coat set completely, then re-dip in freshly melted chocolate. Keep the centers cold so the second coat clings evenly.
Wrapping Up
No Bake Chocolate Peanut Butter Egg Bites deliver that classic chocolate-peanut butter combo with almost no effort.
They look festive, taste incredible, and store well for days. Whether you’re making them for a holiday tray or a weekday treat, you’ll get consistent results with minimal cleanup. Keep a batch in the fridge, and dessert is always just a bite away.