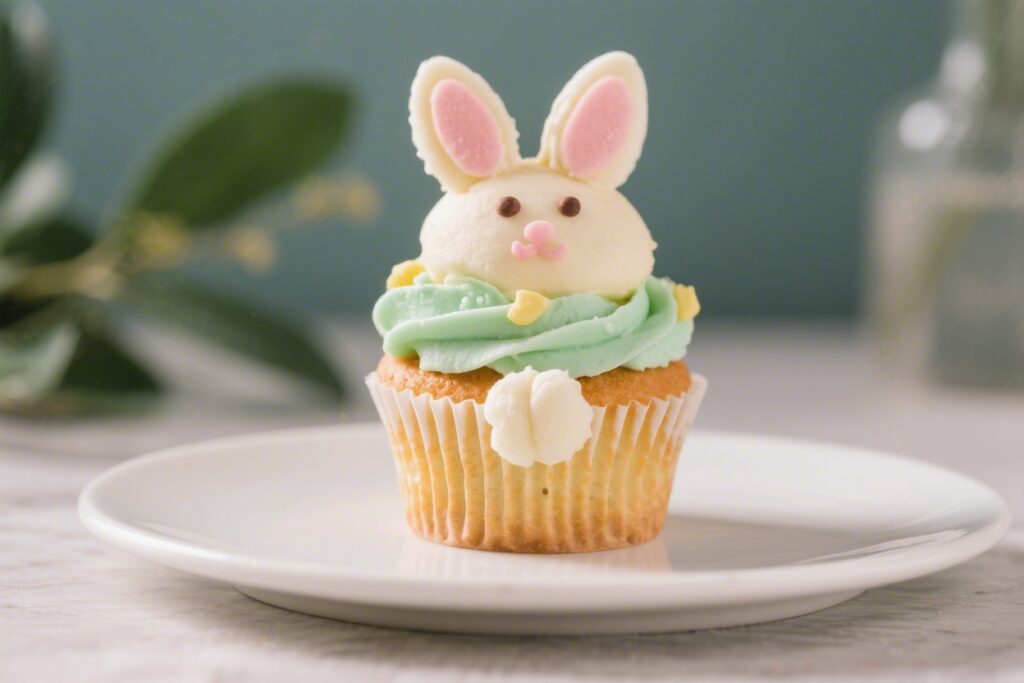
These Easter Bunny Butt Cupcakes bring instant smiles to any spring party or family gathering. They’re playful, pastel, and surprisingly simple to make, even if you’re not a frequent baker. You’ll get soft, chocolatey cupcakes topped with fluffy “grass,” a white bunny tail, and tiny pink feet peeking out.
The best part is decorating them with kids or friends—everyone can make a bunny with its own personality. Whether you’re hosting brunch or just want a fun afternoon project, these cupcakes make it feel like spring finally showed up.
What Makes This Recipe So Good
- Foolproof base: A moist, chocolate cupcake that stays tender and holds up well under frosting and decorations.
- Adorable payoff: The bunny butt design looks pro but uses simple, easy-to-find decorations.
- Kid-friendly project: Minimal precision required. Great for little helpers to decorate.
- Flexible ingredients: Use store-bought or homemade frosting, and swap decorations based on what you have.
- Make-ahead friendly: Bake the cupcakes in advance and decorate right before serving.
Recipe Card
Keeping It Fresh
- Short-term: Store decorated cupcakes in an airtight container at cool room temperature for up to 2 days.
- Longer storage: Refrigerate for up to 4 days, but bring to room temp before serving so the frosting softens.
- Make-ahead plan: Bake cupcakes a day in advance and store unfrosted. Decorate the day you serve for the freshest look.
- Freezing: Freeze unfrosted cupcakes for up to 2 months.
Thaw in their container at room temperature, then frost and decorate.
Why This is Good for You
- Built-in portion control: Cupcakes make it easy to enjoy a treat without overdoing it.
- Hands-on creativity: Decorating engages kids and adults, turning dessert into a fun, screen-free activity.
- Customizable ingredients: Use less sugar in the frosting, choose natural colorings, or swap in whole wheat pastry flour if baking from scratch.
- Holiday connection: Sharing a seasonal tradition can boost mood and bring people together, which is good for overall well-being.
What Not to Do
- Don’t frost warm cupcakes. The buttercream will melt and slide off, and the grass texture won’t hold.
- Don’t overload food coloring. Too much gel can make frosting bitter. Build color slowly.
- Don’t skip structure. If the marshmallow isn’t anchored with frosting, it can topple during transport.
- Don’t store uncovered in the fridge. Frosting absorbs odors and dries out. Always use an airtight container.
- Don’t rush the paw details. The tiny pink pads make the design.
Give them a minute to set before attaching.
Alternatives
- Flavor swaps: Try vanilla, carrot, or lemon cupcakes for a spring twist. Cream cheese frosting pairs well with carrot.
- Dairy-free: Use a dairy-free butter substitute and plant-based milk. Check that your cake mix is dairy-free.
- Gluten-free: Use a gluten-free cake mix or your favorite GF cupcake recipe.
Decorations like marshmallows and candy melts are often GF, but always check labels.
- No fondant option: Draw paw pads with pink icing directly onto white candy melts or white chocolate buttons.
- No piping tip: Spread green frosting and press shredded coconut tinted with a drop of green coloring to mimic grass.
- Natural colors: Use matcha or spinach powder for green grass, and beet powder for pink details.
FAQ
Can I use store-bought frosting?
Yes. Pick a vanilla or cream cheese frosting, tint it green, and pipe away. If it feels too soft, beat in a little powdered sugar to thicken it for better grass texture.
What if I don’t have a grass piping tip?
Use a star tip and pipe short bursts, or spread frosting and cover with green-tinted coconut.
You can also snip the end of a piping bag into a small V and squeeze quick pulls for a rough grass effect.
How do I keep the marshmallows from getting stale?
Assemble the bunny bodies the day you plan to serve, and store the cupcakes airtight. A thin swipe of frosting around the marshmallow’s base also helps protect it from drying out.
Can I make the feet ahead of time?
Absolutely. Shape fondant feet or decorate candy melts up to 3 days in advance.
Let them dry fully and store in a cool, dry container with parchment between layers.
How do I transport these without ruining the grass?
Use a tall cupcake carrier or a shallow box with a fitted lid. Chill the cupcakes for 15–20 minutes before moving them so the frosting firms up slightly.
What’s the best way to get bright, even green frosting?
Use gel food coloring and add it gradually. Mix thoroughly, then let it rest 5 minutes—the color deepens a shade as it sits, which helps you avoid over-coloring.
In Conclusion
Easter Bunny Butt Cupcakes are cute, cheerful, and easy to pull off with basic tools.
Start with a tender cupcake, pipe a field of grass, and perch a marshmallow bunny with tiny pink paws on top. They’re a hit at brunch, school parties, or any spring get-together, and they make decorating feel like play. Keep it simple, have fun with the details, and watch everyone reach for seconds—after snapping a few photos, of course.