If you love soft neutrals, elegant details, and seasonal decor that feels chic instead of cheesy, you are going to adore this DIY.
These ceramic style painted eggs in muted tones are the perfect way to elevate your Easter decor without spending a fortune on boutique pieces. They look like handcrafted pottery, feel beautifully intentional, and blend seamlessly into a neutral, feminine home.
Instead of bright primary colours and glitter overload, we are leaning into:
- Soft sage
- Dusty rose
- Warm beige
- Powder blue
- Muted terracotta
- Creamy off whites
The result is a calm, sophisticated aesthetic that looks stunning on coffee tables, dining tables, shelves, and styled trays.
In this step by step tutorial, you will learn:
- How to prep real or faux eggs for painting
- How to mix and mute acrylic paints for a ceramic inspired finish
- Simple hand painted details that look expensive but are easy to recreate
- How to seal your eggs for that soft matte pottery effect
Whether you are decorating for Easter, styling a spring tablescape, or simply love creative projects that feel elevated, this DIY is an easy way to romanticise your home in the most understated way.
Let’s create something beautiful.
Step 1: Prepare Your Eggs for a Flawless Ceramic Finish
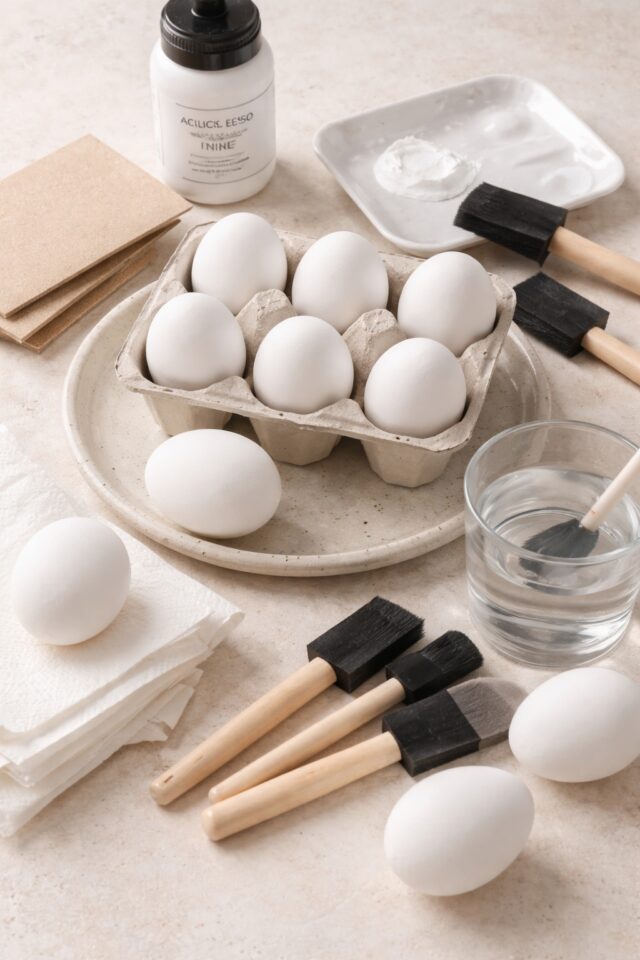
Before we get to the pretty part, we need a smooth, clean base. This step is what gives your painted eggs that elevated, ceramic inspired look instead of craft table chaos.
Take your time here. The finish is everything.
What You’ll Need
- White acrylic paint
- Foam brushes
- Blown out real eggs or faux craft eggs
- Fine grit sandpaper
- Paper towels
- Acrylic gesso primer
How to Prep Your Eggs
1. Choose Your Base
You have two options:
- Blown out real eggs for a delicate, authentic feel
- Faux craft eggs for durability and ease
If you are using real eggs, gently empty and rinse them thoroughly. Let them dry completely before painting. Moisture is not your friend here.
If you are using faux eggs, wipe them down with a damp paper towel to remove any dust or residue.
2. Lightly Sand for Smoothness
Use fine grit sandpaper to gently smooth the surface. This helps paint grip better and gives you that velvety ceramic look instead of streaky shine.
You do not need to go wild. A soft, light pass is enough.
3. Prime for a Luxe Finish
Apply a thin coat of acrylic gesso or white acrylic paint using a foam brush. This creates:
- An even base
- Better colour payoff
- A soft, chalky foundation
Let it dry fully before applying a second coat if needed. Two thin coats always look better than one thick one.
4. Let Them Cure Properly
This is the step most people rush. Do not.
Allow your primed eggs to dry completely before adding any muted colour. If the base is even slightly tacky, your ceramic effect will not look as smooth and refined.
Once dry, you will have the perfect blank canvas. Clean. Matte. Elegant.
Now we are ready to bring in those dreamy muted tones.
Step 2: Create Your Dreamy Muted Colour Palette
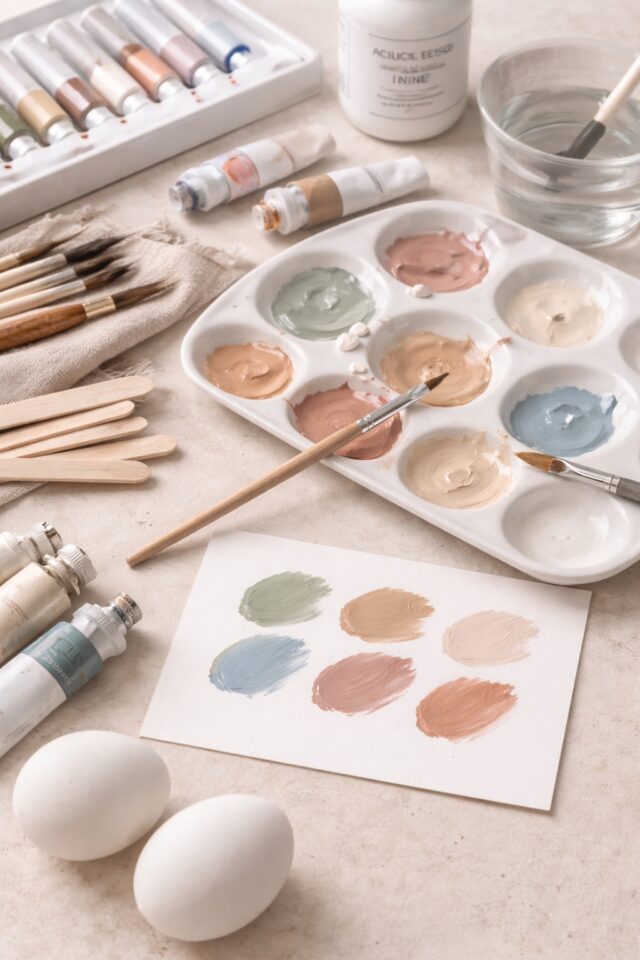
This is where the magic happens.
Muted tones are what transform simple painted eggs into ceramic style decor that looks curated, expensive, and very intentional. We are not grabbing paint straight from the bottle and hoping for the best. We are refining it.
Think soft. Think chalky. Think understated elegance.
What You’ll Need
- Acrylic paint set in neutral and pastel shades
- White acrylic paint
- Small paint palette
- Detail paint brushes
- Craft mixing sticks
- Scrap paper or cardstock for testing colours
How to Mix Muted, Ceramic Inspired Tones
1. Start With a Base Colour
Choose 3 to 5 shades that feel cohesive together. Beautiful combinations include:
- Sage and warm beige
- Dusty rose and clay
- Powder blue and soft cream
- Terracotta and muted blush
Keep your palette tight. Too many colours and the look becomes busy instead of refined.
2. Soften With White
Add small amounts of white acrylic paint to your chosen shade. This:
- Lightens the colour
- Reduces harsh vibrancy
- Creates that soft, chalky finish
Mix gradually. You can always add more white, but you cannot take it away once it is blended.
3. Tone Down With a Touch of Warmth
If a colour still feels too bright, add the tiniest hint of:
- Brown
- Beige
- Or even a speck of its complementary colour
This knocks back intensity and gives you that subtle ceramic depth rather than flat craft paint.
4. Test Before You Commit
Paint a small swatch on scrap paper and let it dry fully. Acrylic paint often dries slightly darker.
This step prevents disappointment and keeps your palette cohesive.
When you are done, you should have a beautifully muted collection of tones that look like they belong together on a styled coffee table, not in a kindergarten art class.
Now that your palette is perfected, we can move on to creating that soft, layered ceramic effect on the eggs themselves.
Step 3: Apply the Ceramic Effect Base
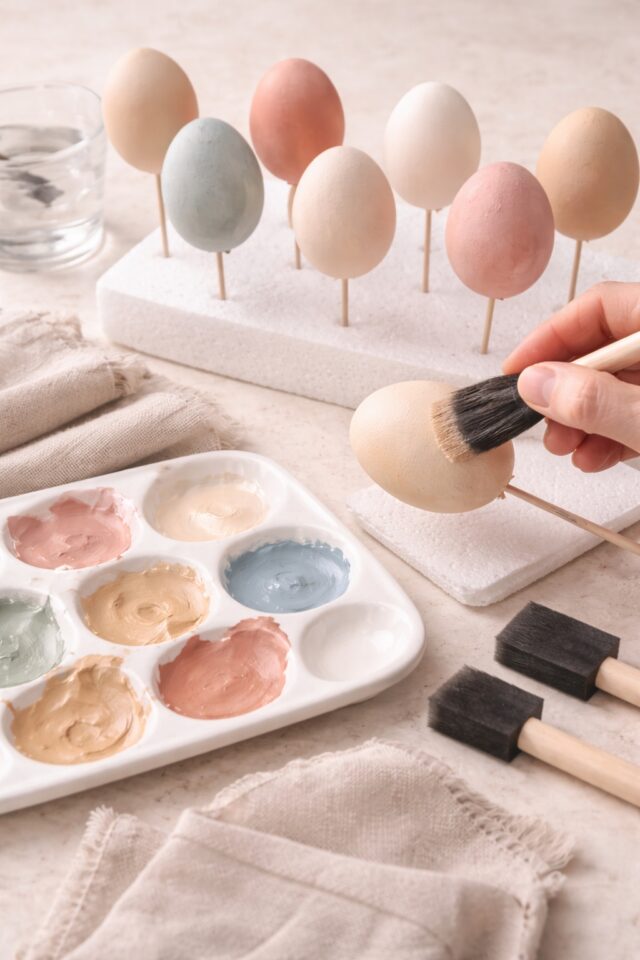
Now we are getting into the transformation stage.
This is where your eggs stop looking like painted craft supplies and start looking like handmade pottery you picked up from a tiny boutique.
The secret is layering and texture. We are not aiming for glossy perfection. We want soft, chalky, slightly imperfect elegance.
What You’ll Need
- Muted acrylic paints from your custom palette
- Foam sponge brushes
- Small paint palette
- Paper towels
- Egg drying rack or craft stand
How to Create That Soft Ceramic Look
1. Use a Sponge, Not a Brush
Dip your foam sponge lightly into your chosen muted shade.
Instead of brushing long strokes, gently dab the paint onto the egg. This technique:
- Creates a soft, diffused texture
- Prevents visible brush lines
- Mimics the subtle variation you see in real ceramics
Work in thin layers. The white base should just slightly disappear under the colour.
2. Build Colour Gradually
Let the first coat dry fully before adding a second.
Two to three light layers will give you:
- Depth
- Soft dimension
- A more authentic pottery effect
Avoid thick paint. Heavy layers look shiny and flat, which is the opposite of what we want.
3. Embrace Subtle Imperfection
Real ceramic pieces are never completely uniform. Allow:
- Slight tonal variation
- Gentle texture from the sponge
- Faint areas where the base peeks through
These details add character and make your eggs feel elevated rather than factory perfect.
4. Let Them Dry Properly
Place your eggs on a drying rack or rest them carefully on a stand so they do not smudge.
Patience here gives you that clean, matte surface ready for delicate detailing in the next step.
At this stage, you should already see the transformation. Soft. Muted. Understated. Exactly the kind of decor that blends beautifully into a neutral, feminine home.
Next, we will add those minimal hand painted details that make them look truly ceramic inspired.
Step 4: Add Minimal, Hand Painted Details
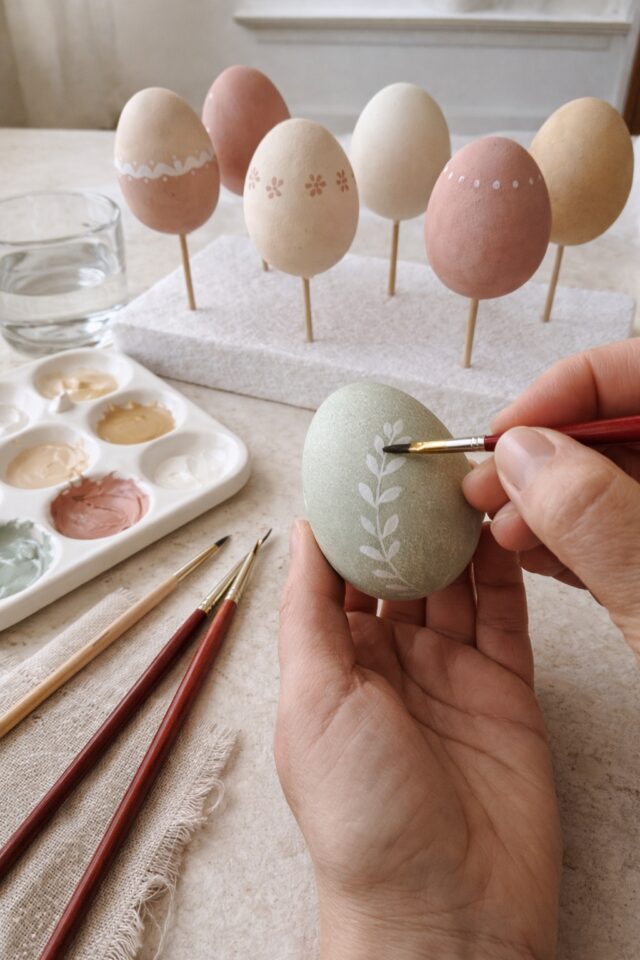
This is the part where your eggs go from pretty to pottery inspired.
We are keeping this refined. Understated. Effortless. The goal is delicate detail, not full on pattern overload.
Less really is more here.
What You’ll Need
- Fine detail paint brush set
- White acrylic paint
- Muted acrylic paints from your palette
- Gold acrylic paint or gold leaf kit
- Pencil for light sketching
How to Create Elegant Ceramic Inspired Designs
1. Keep Your Motifs Simple
Think vintage pottery. Soft European ceramics. Minimal, intentional design.
Beautiful options include:
- Tiny scattered florals
- Fine line leaves
- Dots along the top or bottom edge
- Soft scalloped borders
- Thin vertical or horizontal stripes
Choose one motif per egg. Do not mix five patterns on one piece. We are curating, not decorating a kindergarten project.
2. Lightly Sketch First
If you are nervous about freehand painting, lightly sketch your design with pencil.
Keep the lines faint. You just need a guide. The goal is relaxed elegance, not ruler perfect precision.
3. Use a Steady, Light Touch
Load only a small amount of paint onto your detail brush. Too much paint causes blobs and uneven lines.
Work slowly and rotate the egg as you paint rather than twisting your wrist into awkward angles.
If a line is not perfectly straight, leave it. That subtle imperfection adds to the handmade ceramic effect.
4. Add the Smallest Hint of Metallic
If you want a slightly elevated finish, add:
- A thin gold rim around the top
- Tiny gold dots between florals
- A delicate metallic accent line
Keep it subtle. Just enough to catch the light when styled on a coffee table or Easter tablescape.
When you step back, your eggs should feel calm, cohesive, and thoughtfully designed.
They should look like something you chose with intention, not something you rushed.
Next, we will seal everything in for that soft matte, pottery style finish that makes them look truly ceramic.
Step 5: Seal for a Soft Matte Ceramic Finish
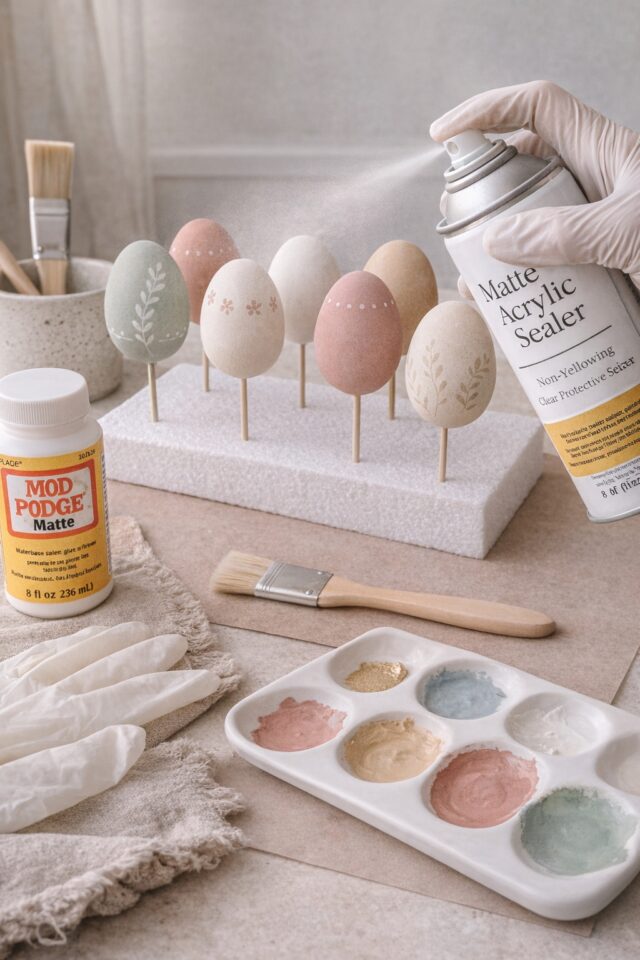
This is the final glow up moment.
You have done the prep. You have layered those muted tones. You have added delicate, minimal details. Now we lock it all in so your eggs look like real ceramic decor, not something that will smudge the second someone touches it.
The finish is what makes the difference.
What You’ll Need
How to Seal Like a Pro
1. Choose a Matte Finish Only
Gloss will ruin the ceramic illusion instantly.
A matte sealer gives you:
- That soft, chalky pottery effect
- A smooth, refined surface
- Protection without shine
If you want the most authentic ceramic feel, always choose matte over satin or gloss.
2. Apply Thin, Even Layers
If using spray sealer:
- Work in a well ventilated area
- Hold the can about 8 to 10 inches away
- Use light, sweeping motions
If using brush on sealer:
- Use a soft, wide brush
- Apply thin coats
- Avoid overworking the surface
One thick coat can create streaks or slight shine. Two light coats are far better.
3. Let Them Cure Fully
Dry to the touch is not the same as fully cured.
Allow your eggs to sit undisturbed for at least 24 hours before styling. This ensures:
- No tacky residue
- No accidental fingerprints
- A truly durable finish
Once sealed and cured, your eggs will feel smooth, soft, and beautifully finished.
They should look like small ceramic art pieces you deliberately styled in your home.
And that is exactly the energy we are going for.
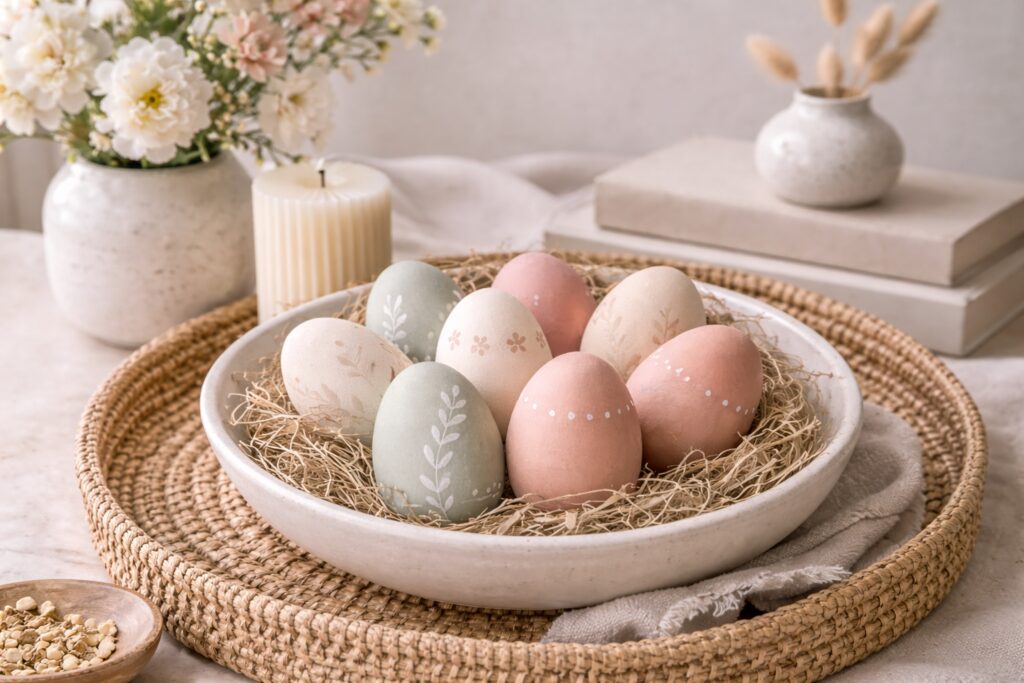
Styling Your Ceramic Style Painted Eggs
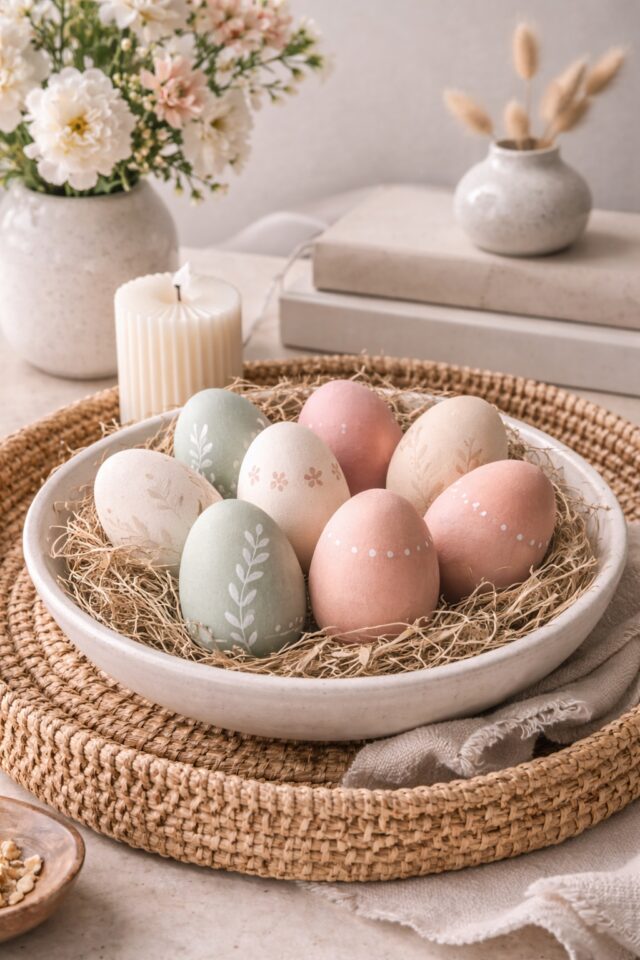
Now for the fun part.
You did not create these beautiful, muted ceramic style eggs just to leave them in a craft box. We are styling them like the elegant decor pieces they are.
This is where your creativity meets intention.
1. Create a Soft, Neutral Bowl Display
Place your eggs in:
- A shallow ceramic bowl
- A woven tray
- A stoneware dish
Layer the base with:
- Natural moss
- Crumpled linen
- Dried grass
- Shredded kraft paper
Keep the palette cohesive. If your eggs are sage and blush, do not suddenly introduce neon pink filler. Calm, curated, cohesive.
Set the bowl on a coffee table, console, or dining table for instant spring elegance.
2. Style a Minimal Easter Tablescape
Use your eggs as part of a refined tablescape:
- Tuck one beside each place setting
- Pair with neutral napkins and simple glassware
- Add fresh flowers in soft tones
- Use tapered candles in cream or beige
The result feels elevated and intentional, not theme park Easter.
3. Add Them to a Styled Tray
A tray moment is always a yes.
Combine your eggs with:
- A small stack of books
- A ceramic vase with fresh blooms
- A linen candle
- A subtle gold accent
Group in odd numbers for a more natural look. Three or five eggs always feel more styled than four.
4. Display on Open Shelving
If you love layered decor, place your eggs:
- On floating shelves
- Inside a glass cloche
- Alongside neutral ceramics
Mix textures like wood, stone, linen, and glass to enhance that handmade pottery aesthetic.
5. Keep It Simple
The biggest styling mistake is overcrowding.
These eggs are subtle statement pieces. Let them breathe. Negative space is your friend.
When styled thoughtfully, your ceramic style painted eggs will look like something you picked up from a boutique home store.
Except you made them.
And honestly, that makes them even better.