If you want a fun Easter dessert that looks adorable, takes almost no effort, and doesn’t involve turning on the oven, these Easter Dirt Cups are calling your name. They’re creamy, chocolatey, and layered with crushed cookies, then topped with festive Easter decorations that make everyone smile.
Perfect for Easter parties, spring gatherings, or a cosy holiday at home, these dirt cups are proof that cute desserts don’t need to be complicated.
Why You’ll Love These Easter Dirt Cups
- No-bake and totally beginner friendly
- Quick to assemble with simple ingredients
- Perfect individual servings for parties and gatherings
- Easy to customise for kids and adults
- Fun, festive, and guaranteed to disappear fast
What Makes These Easter Dirt Cups Special
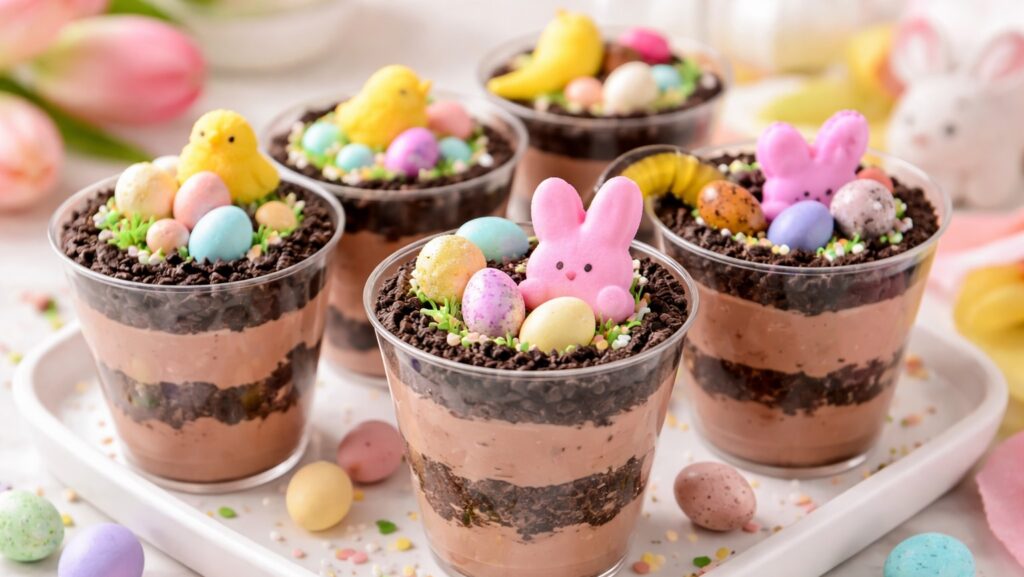
These aren’t just your classic dirt cups. The Easter twist comes from pastel colours, seasonal candies, and playful decorations that make them perfect for spring celebrations. They’re simple enough for everyday fun but cute enough to sit proudly on your Easter table.
Equipment Needed
- Mixing bowl
- Hand mixer or whisk
- Rubber spatula
- Measuring cups and spoons
- Clear plastic cups or small jars
- Spoon or piping bag for layering
Ingredients You’ll Need
- Chocolate sandwich cookies
- Instant chocolate pudding mix
- Cold milk
- Cream cheese, softened
- Whipped topping
- Gummy worms, mini chocolate eggs, marshmallow chicks, or Easter sprinkles for decorating
How to Make Easter Dirt Cups
- Place the chocolate sandwich cookies into a bag or food processor and crush into fine crumbs. Set aside.
- In a mixing bowl, whisk together the instant pudding mix and cold milk until thickened.
- In a separate bowl, beat the softened cream cheese until smooth.
- Gently fold the whipped topping into the cream cheese until fully combined.
- Stir the pudding mixture into the cream cheese mixture until smooth and creamy.
- Spoon a layer of cookie crumbs into the bottom of each clear cup.
- Add a layer of the pudding mixture.
- Repeat the layers until the cups are full, finishing with cookie crumbs on top.
- Chill in the fridge for at least 30 minutes before decorating.
Handy Shopping List
- Chocolate sandwich cookies
- Instant chocolate pudding mix
- Milk
- Cream cheese
- Whipped topping
- Easter candy decorations
- Clear dessert cups
Decorating Ideas
- Top with gummy worms for classic dirt cup fun
- Add mini chocolate eggs for an Easter look
- Use marshmallow chicks or bunnies for extra cuteness
- Sprinkle pastel sprinkles or edible grass on top
- Finish with a small Easter pick or flag
Make-Ahead and Storage Tips
- These dirt cups can be made up to 24 hours in advance
- Store covered in the refrigerator until ready to serve
- Add decorations just before serving for the best texture
- Not freezer friendly due to the creamy filling
Variations and Swaps Including Healthier Options
- Swap chocolate pudding for vanilla pudding for a lighter flavour
- Use reduced-fat cream cheese and light whipped topping
- Try chocolate graham crackers instead of sandwich cookies
- Use dairy-free pudding and whipped topping for a dairy-free version
- Add a layer of sliced strawberries or bananas for a fresher twist
Serving Suggestions
- Serve chilled straight from the fridge
- Display on a tiered stand for Easter brunch
- Pair with coffee, tea, or hot chocolate
- Perfect for Easter parties, school events, or casual spring get-togethers
Final Thoughts
These Easter Dirt Cups are everything a holiday dessert should be. Fun, festive, easy, and zero stress. Whether you’re hosting a crowd or just want a sweet treat to celebrate the season, this recipe delivers maximum joy with minimal effort.
Because Easter desserts should be cute, delicious, and leave you plenty of time to actually enjoy the day 💕🐣