Introduction
If you’ve ever wanted your home to feel like a calm, expensive little spa without actually spending spa money… this is your moment.
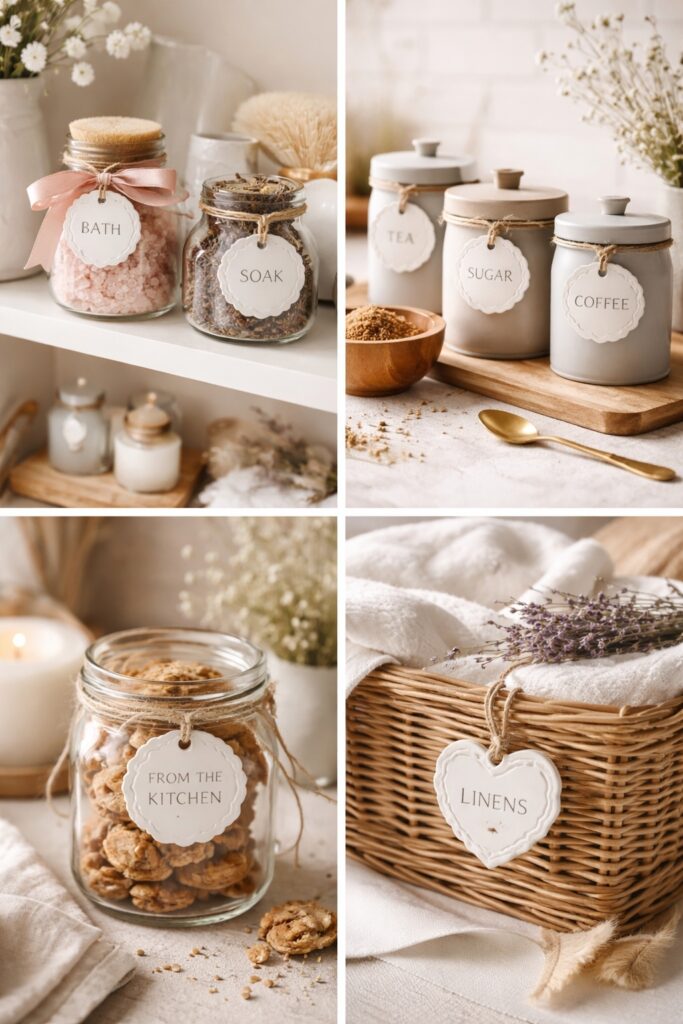
These cozy bath tisane tags are one of those small details that somehow make everything feel more put together. You can tie them onto jars of bath salts, label your favourite tea blends, or add them to gifts and instantly look like the most thoughtful person in the room. And the best part? They smell amazing. Think soft lavender, fresh citrus, or whatever scent makes you feel like you’ve got your life together.
What I love most is how simple they are to make. No complicated techniques, no fancy tools, just a little creativity and a few easy steps. You get something that looks aesthetic, feels intentional, and adds that subtle, elevated touch to your space.
If you’re in your soft, romanticise-your-life era and want your shelves, bathroom, or kitchen to match the vibe… you’re going to be obsessed with these.
Why You’ll Love These Cozy Bath Tisane Tags
Let’s be honest, we’re not just making these because they’re useful. We’re making them because they make everything look effortlessly put together.
These little tags sit right in that sweet spot between practical and pretty. They label your jars, organise your space, and still manage to feel like a tiny piece of decor. It’s giving intentional. It’s giving I have my life together energy… even if your laundry says otherwise.
They’re also completely customisable. You get to choose your shapes, your colours, your scents, and your lettering style. Want a soft neutral spa look? Done. Prefer something a little more playful or seasonal? Also done. You’re in control of the whole aesthetic.
And let’s talk about that scent for a second. It’s not overpowering, it’s not trying too hard. It’s just a subtle, clean fragrance that hits when you pick something up or open a jar. The kind of detail that makes your space feel calm, fresh, and just a little bit luxurious.
Plus, they make ridiculously good gifts. Thoughtful, handmade, and actually useful. No one’s regifting these, trust me.
What You’ll Need
This is one of those projects where you don’t need anything fancy, but the right tools will make your life so much easier and your finish look extra polished.
- Air-dry clay or oven-bake clay
Your base material. Air-dry is easier, oven-bake is more durable. Pick your personality. - Essential oils (lavender, citrus, etc.)
This is where the spa magic happens. Go for scents you actually love. - Rolling pin or smooth bottle
For getting that nice, even thickness without the chaos. - Cookie cutters or a sharp knife
Use cutters for clean shapes or freehand it if you’re feeling creative. - Toothpicks or skewers
For making the holes so you can thread ribbon or twine through. - Fine grit sandpaper
This is your secret to that smooth, aesthetic finish. - Acrylic paint or paint pens
For lettering, doodles, or keeping it minimal and chic. - Twine or ribbon
Choose something that matches your overall vibe. - Clear matte sealant
Locks everything in and keeps your tags looking fresh, not sticky.
Quick tip: keep your palette and materials cohesive from the start. It’s the easiest way to make everything look intentional instead of random.
Step-by-Step: How To Make Scented Clay Tags
This is where it all comes together. Take your time, enjoy the process, and don’t overthink it. These are meant to feel effortless, not stressful.
Step 1: Prep Your Clay
Start by kneading your clay until it’s soft and easy to work with. This helps prevent cracks later.
Add a few drops of your chosen essential oil and work it through the clay evenly. Go light here, you want a subtle scent, not something overpowering.
Step 2: Roll and Shape
Roll your clay out on a flat surface until it’s about 3 to 5 mm thick. Keep it even so your tags look polished.
Use cookie cutters for clean, consistent shapes or cut your own if you want something more organic and relaxed.
Step 3: Add Holes for Hanging
Use a toothpick or skewer to create a hole near the top of each tag.
Make it slightly bigger than you think you need because the clay can shrink a little as it dries or bakes.
Step 4: Dry or Bake
Follow the instructions for your clay type.
Air-dry clay will need time to fully harden, usually 24 to 48 hours. Oven-bake clay will be quicker but needs to be baked according to the packaging.
Make sure they’re completely set before moving on.
Step 5: Sand for a Smooth Finish
Once your tags are fully dry, lightly sand the surface and edges.
This step makes a huge difference. It gives you that clean, smooth base that looks way more high-end.
Step 6: Paint and Personalise
Now for the fun part. Add your labels, names, or simple designs.
Keep your lettering neat and minimal for that chic, spa-inspired look. A little goes a long way here.
Step 7: Seal and Finish
Apply a clear matte sealant to protect your design and keep the surface from absorbing oils or moisture.
Once dry, thread your ribbon or twine through the hole and tie it off.
And just like that, you’ve got custom tags that look like they came straight out of a boutique.
Styling Ideas: Where To Use Your Tags
This is where you get to have fun and make everything look like it belongs on a Pinterest board.
These tags aren’t just labels, they’re little styling moments. The kind of detail that makes your space feel intentional, calm, and just a bit elevated without trying too hard.
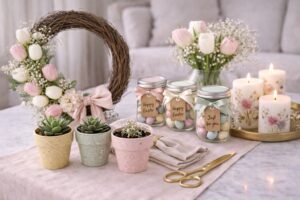
Start with your bathroom. Tie them onto glass jars filled with bath salts, dried flowers, or bath soaks. Suddenly your shelf goes from functional to spa energy in about two seconds.
In the kitchen, they’re perfect for tea tins, sugar jars, or anything you want to make look a little more curated. If you’ve been dreaming of that aesthetic pantry look, this is your sign.
They also work beautifully for gifting. Add one to a jar of homemade treats, a small self-care bundle, or even a simple wrapped present. It instantly feels more thoughtful and personal.
And don’t overlook the little corners of your home. Hang them on drawer handles, tuck them into baskets, or use them as subtle scent accents in wardrobes. It’s those tiny details that quietly pull everything together.
Basically, if it can be tied, labelled, or styled… it can be upgraded with one of these.
Design Tips For That Soft, Elevated Look
This is where you take your tags from “cute DIY” to “wait… did you buy these?”
The secret is keeping things simple and intentional. You don’t need more, you just need better choices.
Start with your colour palette. Stick to soft, muted tones like warm neutrals, dusty pinks, sage, or soft greys. When everything sits in the same colour family, it instantly feels more polished and cohesive.
Keep your lettering clean and minimal. Think simple words, neat spacing, and no over-decorating. You want it to feel calm and considered, not busy. If in doubt, less wins every time.
Play with shape, but don’t go wild. Mixing a couple of shapes like arches and rectangles adds interest without making things feel chaotic. Pick a direction and stay consistent.
Texture matters more than you think. That light sanding and matte finish? That’s what gives you that soft, almost ceramic look that feels expensive.
And finally, step back before you call it done. Look at your tags together as a set. Do they feel cohesive? Do they match the vibe of your space? If yes, you nailed it. If not, tweak before you seal.
This is your moment to channel calm, effortless elegance… not craft drawer chaos.
Scent Pairing Ideas (This Is Where It Gets Fun)
Now for the part that makes these feel extra special. The scent.
This is where you can really personalise your tags and create a whole mood, not just a label. Think about how you want your space to feel, not just how you want it to look.
If you’re going for calm and cosy, lavender and vanilla is your go-to. Soft, relaxing, and perfect for bathrooms or bedside spaces where you want to switch off.
For something fresh and clean, try lemon and eucalyptus. It gives that just-cleaned, airy vibe that works beautifully in kitchens or open shelving.
If you love a warmer, slightly comforting feel, orange and cinnamon is a dream. It’s subtle but cosy, especially in cooler months or for gift sets.
And if you’re leaning into soft, feminine energy, rose and sandalwood is chef’s kiss. It’s gentle, a little romantic, and feels quietly luxurious.
The key is to keep it subtle. These aren’t meant to overpower the room. They’re little moments of scent that you notice when you’re close, like a quiet detail that makes everything feel more considered.
Pick one scent palette for a cohesive look, or switch it up depending on where you’re using them. Either way, your space is about to smell as good as it looks.
Common Mistakes To Avoid
Before you get too excited and start making ten at once, let’s save you from a few little DIY regrets.
First up, adding too much essential oil. I know it’s tempting, but more is not better here. Too much oil can mess with the texture of the clay and leave you with tags that don’t set properly. Keep it light and let the scent stay subtle.
Next, making your holes too small. It seems like a tiny detail, but once the clay dries, that hole is not getting bigger. Give yourself enough space for ribbon or twine so you’re not fighting with it later.
Skipping the sanding step is another one. It might feel optional, but it’s what takes your tags from slightly rough to smooth and polished. If you want that elevated finish, don’t skip it.
Over-designing is a big one too. Adding too many colours, fonts, or patterns can quickly make things feel cluttered. These look best when they’re simple, soft, and cohesive.
And finally, not sealing your tags. Without a sealant, they can absorb moisture or pick up unwanted smells over time. A quick matte seal keeps everything looking fresh and feeling intentional.
Avoid these, and you’re already ahead of most DIY attempts.
Gift Idea: Turn These Into A Mini Spa Set
If you want to take these from cute DIY to “wow, you really thought this through”… this is your move.
Bundle your tags into a mini spa-style gift set. It’s simple, it’s affordable, and it looks like something you’d find in a boutique.
Start with a small glass jar or pouch. Fill it with bath salts, dried herbs, or even loose tea. Tie your scented tag around the top with a soft ribbon or twine, and suddenly the whole thing feels elevated.
You can layer it up if you’re feeling extra. Add a candle, a face mask, or a little handwritten note. Keep everything in the same colour palette so it looks cohesive and intentional.
These are perfect for birthdays, housewarmings, or those “just because” moments when you want to give something thoughtful without overcomplicating it.
And the best part? It feels personal. Not generic, not rushed. Just a soft, considered gift that says I actually put effort into this.
FAQ
How long does the scent last?
The scent is subtle and usually lasts a few weeks, depending on how much oil you used and where the tags are placed. In smaller spaces like drawers or jars, it tends to linger a little longer.
Can I refresh the scent?
Yes, and it’s super easy. Just add a tiny drop of essential oil to the back of the tag and let it absorb. Good as new.
Which clay works best?
Both air-dry and oven-bake clay work well. Air-dry is great for beginners, while oven-bake is a bit more durable if you want something longer lasting.
Do I have to seal them?
Technically no, but highly recommended. A matte seal helps protect the surface and stops the tags from picking up unwanted smells or moisture over time.
Can I use these for things other than bath or tea?
Absolutely. They work anywhere you want a soft scent and a pretty label. Think wardrobes, gift wrapping, pantry jars, or even decorative baskets.
Final Thoughts
It’s funny how something this small can make such a difference, but that’s exactly the point.
These cozy bath tisane tags are one of those little upgrades that quietly pull everything together. They don’t shout for attention, but they make your space feel calmer, more intentional, and just a bit more you.
And the best part? You made them yourself. You chose the scent, the shape, the vibe. That’s what turns a simple DIY into something that actually reflects your style.
So don’t overthink it. Pick a colour palette you love, keep the design soft and simple, and let the details do their thing.
Because creating a home you love isn’t about doing everything perfectly. It’s about adding those small, thoughtful touches that make everyday moments feel a little more special.