Let’s be honest… tiny things just hit different. And when those tiny things look like perfectly frosted donuts, pastel macarons, and buttery little cookies? I’m obsessed already.
These miniature food charms are the kind of DIY that makes people do a double take. They look almost edible, they feel ridiculously cute, and somehow they manage to turn everyday things like your keys or bag into something that feels way more you. It’s playful, a little bit aesthetic, and very much main character energy.
The best part? You don’t need to be an artist or a perfectionist to make these. Start with simple shapes like donuts or macarons, add a glossy glaze and a few sprinkles, and suddenly you’ve got something that looks like it came straight out of a boutique. No baking, no mess, no stress.
If you love the idea of creating something small, beautiful, and completely joy-sparking, you’re going to have way too much fun with this. And fair warning… once you make one, you’ll want to make a whole collection.
Why Miniature Food Charms Are So Popular
There’s something about these tiny treats that just makes people smile. They tap into that playful, creative side of you while still looking polished enough to feel intentional. It’s the perfect mix of fun and aesthetic, which is exactly why they’re everywhere right now.
First, they’re ridiculously satisfying to make. You get that same “I made this” feeling you would from baking, but without the mess or the pressure of getting it perfect. Clay is forgiving, so you can take your time, tweak the details, and actually enjoy the process.
They’re also super customisable. Want soft, pastel macarons? Done. Prefer chocolatey, bakery-style cookies? Easy. You can match your charms to your style, your mood, or even the season. It’s giving creative freedom without overwhelm.
And let’s talk about how versatile they are. These little charms can go on keychains, bags, jewellery, gift wrap… basically anywhere you want a tiny pop of personality. They’re small, but they make everything feel more thoughtful and put together.
Honestly, they fit perfectly into that whole “romanticise your life” vibe. It’s about taking something ordinary and making it feel special, just because you can. And if that’s not a reason to start a new DIY obsession, I don’t know what is.
What You’ll Need to Get Started
Before you start creating your tiny bakery masterpiece, let’s get your setup sorted. The good news? You don’t need anything fancy or expensive to begin. A few basics and you’re good to go.
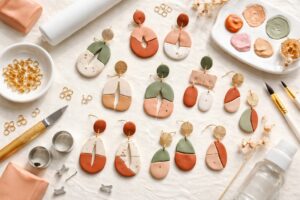
Basic Supplies
These are your must-haves to create sturdy, cute little charms:
- Polymer clay (think soft pinks, creams, browns, and pastels)
- Clay tools set or toothpicks for shaping details
- Craft knife for clean edges
- Eye pins for jewelry making (so you can turn them into charms)
- Jump rings and keychain findings
- Baking tray or oven-safe surface for curing
Optional But Game-Changing
If you want that “wait… is that real?” finish, these extras make all the difference:
- Gloss glaze or varnish for that shiny icing look
- Soft pastels or chalk to add shading and depth
- Fine paintbrushes for detail work
- Texture tools or DIY options like foil or an old toothbrush
The vibe here is simple: start with the basics, then upgrade as you go. You don’t need a full craft drawer to make something adorable. Even a few tools can create those tiny details that make your charms look extra special.
Easy Beginner Designs to Try First
If you’re new to this, don’t overcomplicate it. The magic is in starting simple and letting those tiny details do the heavy lifting. These designs are quick, satisfying, and honestly… a little addictive.
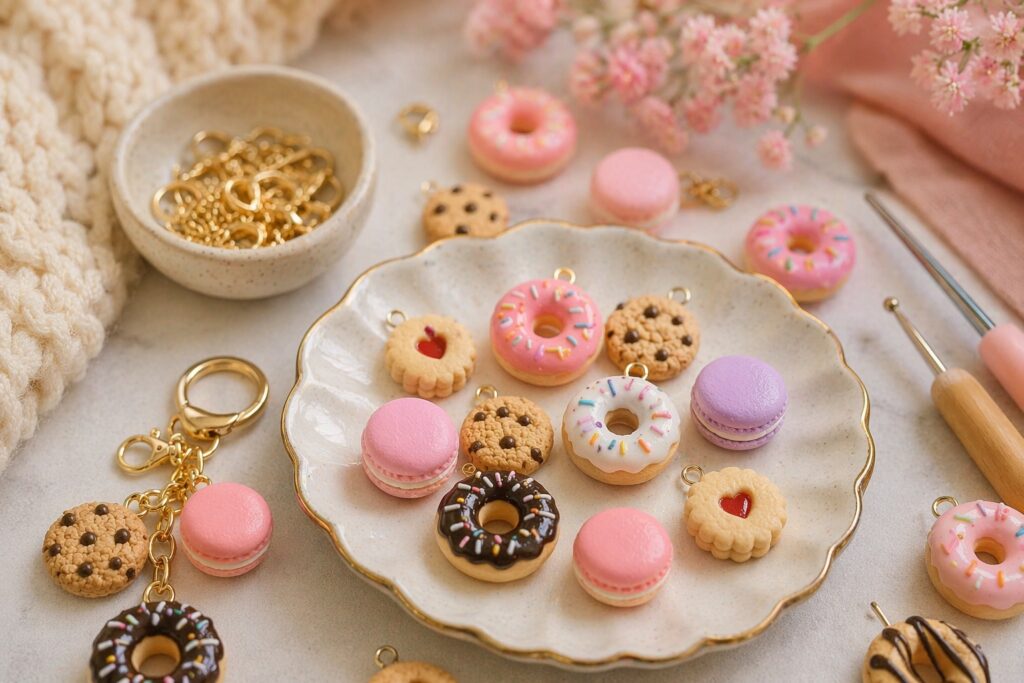
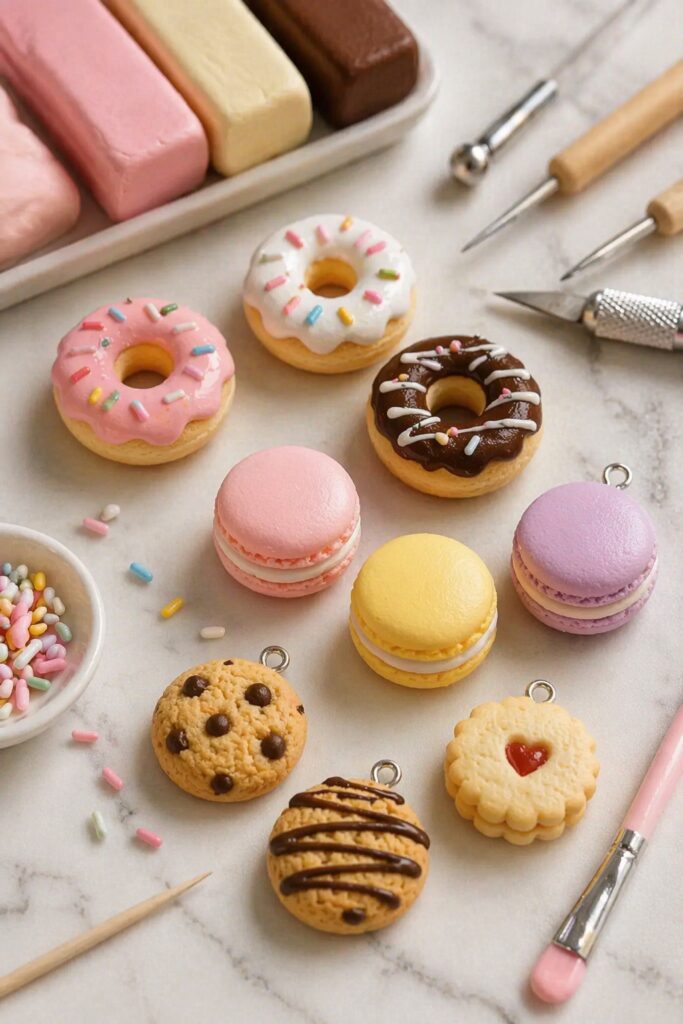
Donuts
- Roll a small ball of clay and gently shape it into a ring
- Add a slightly uneven edge for that realistic baked look
- Create an icing layer with soft drips
- Finish with tiny sprinkles for instant cuteness
This is the one that gets compliments every time. Gloss it up and it looks so real.
Macarons
- Make two small, even discs
- Add a thin layer of “filling” in between
- Lightly texture the edges for that signature macaron look
- Stick to soft pastels for that chic, bakery vibe
They’re simple, but they look expensive. We love that.
Cookies
- Flatten a small piece of clay into a disc
- Add chocolate chips or texture for a baked finish
- Slightly rough edges make it feel more realistic
- Optional: drizzle with “icing” for extra detail
Cookies are perfect if you want something quick but still super cute. Plus, they’re very forgiving if things aren’t perfectly shaped.
Start with one or two of these, get a feel for the clay, and then build your little collection from there. This is where the obsession begins, just saying 😌
Step-by-Step: How to Make a Mini Donut Charm
Alright, this is where the magic happens. Donuts are hands down one of the easiest designs to start with, but they still give you that “wow, I made that?!” moment when you’re done.
- Roll your base
Take a small piece of clay and roll it into a smooth ball. Keep it small, remember we’re going for cute and tiny, not bakery-sized. - Shape the donut
Gently flatten the ball, then use a toothpick or tool to create the centre hole. Don’t stress about perfection, slightly uneven actually looks more realistic. - Add texture
Lightly dab the surface with a toothpick or sponge to mimic that soft, baked texture. This is one of those little details that makes a big difference. - Create the icing layer
Roll out a thin piece of clay for the icing and drape it over the top. Let it fall naturally so you get that soft drip effect. This is where the charm really comes to life. - Add sprinkles
Use tiny bits of coloured clay to create sprinkles. Keep them random and slightly imperfect so it looks natural, not too uniform. - Insert the eye pin
Carefully twist an eye pin into the top of your donut while the clay is still soft. This is what turns it into a charm, so make sure it’s secure. - Bake your charm
Place it on a baking tray and cure it according to your clay’s instructions. Keep an eye on it so the colours stay soft and pretty. - Seal with gloss
Once cooled, add a layer of gloss glaze to the icing for that shiny, realistic finish. This is the step that takes it from cute to “is that real?”
Take your time with this. It’s not about rushing, it’s about enjoying the process and creating something that feels a little bit special. And once you’ve made one… you already know you’re making ten more.
How to Make Them Look Real (This Is the Secret Sauce)
Okay, this is where you go from “cute little craft” to “wait… is that edible?” energy. The difference is all in the details, and honestly, it’s easier than you think once you know what to look for.
First, add subtle shading. Real food isn’t one flat colour. Lightly brush on soft pastels or chalk around edges and dips to create depth. A little shadow goes a long way in making your pieces feel more lifelike.
Next, embrace imperfection. Perfect shapes actually look less real. Slightly uneven edges, tiny dents, and irregular icing drips make your charms feel like they came straight from a bakery, not a mould.
Then there’s the magic combo: matte + gloss. Keep the base (like the donut or cookie) more matte, and make the icing or chocolate glossy. That contrast instantly makes everything pop and look realistic.
Also, keep your scale consistent. If your donut is tiny, your sprinkles need to be tiny tiny. Oversized details are the fastest way to break the illusion.
And finally, less is more. It’s tempting to add all the details, all the colours, all the extras… but the most realistic pieces are usually the simplest. A clean glaze, a few sprinkles, done. Chic, not chaotic.
This is the part where your charms start looking like something you’d spot in a boutique. And yes, people will ask if they’re real.
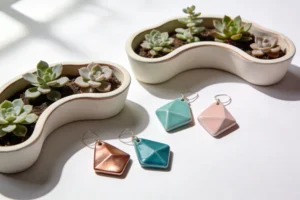
Styling Ideas: Where To Use Your Charms
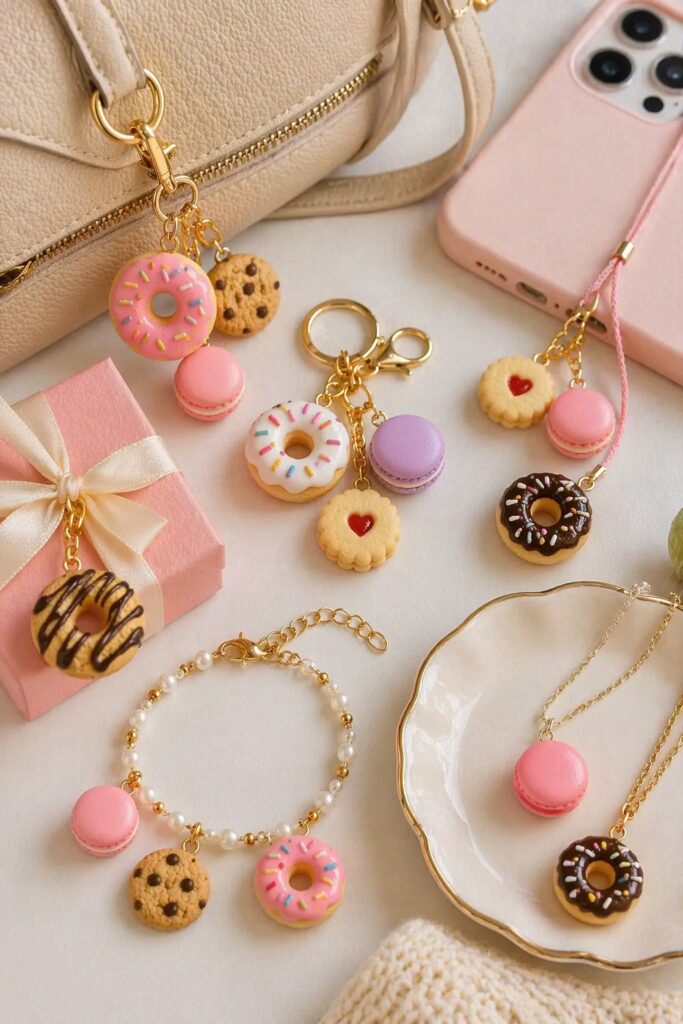
Now that you’ve made your tiny masterpieces, let’s not just leave them sitting in a drawer. These little charms are meant to be seen, styled, and shown off a little. Think of them as tiny accessories that add personality to your everyday life.
Keychains
The easiest place to start. Add one or a mix of charms to your keys and suddenly something boring feels cute and intentional. Bonus points if you match them to your vibe or colour palette.
Bag accessories
Clip a charm onto your handbag, tote, or backpack for that subtle but playful detail. It’s giving “I pay attention to the little things” energy.
Jewellery pieces
Turn them into bracelets or necklaces for something completely unique. A tiny macaron charm on a delicate chain? Adorable and a little bit unexpected.
Phone charms
Bring back the phone charm moment but make it aesthetic. One or two small pieces is all you need to elevate your phone without overdoing it.
Gift toppers
This is where it gets extra thoughtful. Tie a charm onto a gift instead of a standard tag and suddenly your wrapping looks boutique-level. It’s a small detail that makes a big impression.
This is such a perfect fit for that creative, intentional living vibe you are all about . You’re not just making something cute, you’re adding little moments of joy to everyday things.
And honestly, once you start styling them… you’ll find excuses to make more.
DIY Gift Idea: Mini Dessert Charm Sets
If you want to turn these tiny creations into something extra special, mini dessert charm sets are the way to go. They’re thoughtful, creative, and feel far more personal than a standard gift.
Start by choosing a theme or colour palette. Soft pastels for a bakery-inspired look, warm neutrals for something cosy, or even bold colours for a fun, playful vibe. Keeping everything cohesive makes the set feel intentional and polished.
Next, mix a few different charms together. A small collection of 2 to 4 pieces works perfectly. For example, a donut, a macaron, and a cookie instantly create that “mini dessert box” feel without being overwhelming.
When it comes to packaging, simple details make a big difference:
- Small gift boxes or clear jars
- Ribbon or twine for a soft finish
- A handwritten tag or note for a personal touch
These sets are perfect for birthdays, party favours, or little surprise gifts. They feel unique, handmade, and just a bit special without requiring a huge amount of time or effort.
It’s a simple way to turn a fun DIY into something that people genuinely love receiving.
Common Mistakes to Avoid
Before you get too deep into your mini bakery era, let’s save you a few frustrations. These are the little mistakes that can make a big difference, especially when you’re just starting out.
Making pieces too big
It’s easy to underestimate how small these should be. Smaller = cuter and more realistic. If it feels tiny, you’re probably doing it right.
Skipping texture
Smooth clay might seem fine, but real food has texture. A quick dab with a toothpick or sponge adds that baked look and instantly makes your charm more believable.
Overworking the clay
The more you handle it, the softer and messier it gets. If details start looking blurry, pause, let it firm up a little, then go back in.
Using too much glaze
Gloss is amazing… until it’s dripping everywhere. A thin, even layer is all you need for that realistic finish.
Forgetting to secure the eye pin
If the eye pin isn’t properly inserted, your charm won’t last. Gently twist it in and make sure it feels stable before baking.
Trying to make everything perfect
This one matters most. Real desserts aren’t flawless, and yours don’t need to be either. Slight imperfections are what make them look real and handmade.
Avoid these, and you’ll skip a lot of trial and error. And honestly, even the “mistakes” usually still turn out cute, so you really can’t lose here.
Pro Tips for Next-Level Results
Once you’ve got the basics down, this is where things start to look seriously good. These little tweaks take your charms from “cute DIY” to “I can’t believe that’s handmade.”
Work in batches
Instead of making one charm at a time, create a few bases together, then add details in stages. It saves time and helps everything look more consistent.
Pre-mix your colours
Blend your clay colours before you start shaping. This gives you softer, more realistic tones and avoids harsh, flat colours.
Use reference photos
Look at real donuts, cookies, and macarons while you work. Notice the textures, colours, and little imperfections. Copying those details makes a huge difference.
Keep your tools clean
Tiny smudges show up fast on small pieces. Wipe your tools regularly to keep edges crisp and colours clean.
Less is more
It’s tempting to add extra drizzle, extra sprinkles, extra everything… but the most realistic pieces are often the simplest. Let one or two details shine.
Let layers set before adding more
If your clay starts getting too soft, pause. Giving it a little time to firm up helps keep details sharp instead of squished.
These are the small habits that elevate your work without making it harder. And once you start using them, you’ll notice the difference straight away.
FAQ
Do I need special clay for this?
Yes, polymer clay is the best option. It’s durable, easy to work with, and holds those tiny details really well once baked.
Do I need an oven?
You do need some form of heat to cure polymer clay. A regular home oven works perfectly, just follow the instructions on your clay packaging.
How long do these charms last?
If they’re baked and sealed properly, they can last for years. They’re lightweight but surprisingly sturdy.
Can beginners make these?
Absolutely. Start with simple shapes like donuts or cookies, and you’ll get the hang of it quickly. It’s very beginner-friendly.
Why do my charms not look realistic yet?
It usually comes down to texture, shading, and scale. Adding small details and keeping everything proportionate makes a big difference.
Can these be sold?
Yes, handmade charms are popular for marketplaces and craft fairs. Just make sure your finish is neat and your findings are secure.
Conclusion
Miniature food charms are one of those DIYs that are easy to start but impossible to stop. They’re fun, creative, and just the right mix of playful and aesthetic.
Whether it’s a tiny donut on your keys or a full set of pastel macarons as a gift, these little pieces add personality in the sweetest way. And the best part? You made them yourself.
Start simple, enjoy the process, and don’t overthink it. The charm really is in the tiny details… and once you see your first finished piece, you’ll already be planning the next one.