Spring is your permission slip to refresh, reset, and make your home feel intentional again. And nothing says fresh start quite like an elegant Easter wreath welcoming you home.
This is not about overly bright plastic decor or anything that feels chaotic. We are doing soft, polished, feminine energy. Think neutral florals, subtle pastels, delicate greenery, and just enough Easter detail to feel seasonal without looking themed.
If you love the idea of elevating your space in a way that feels grown, chic, and completely you, these DIY Easter wreath ideas are about to become your new obsession.
In this post, you’ll find:
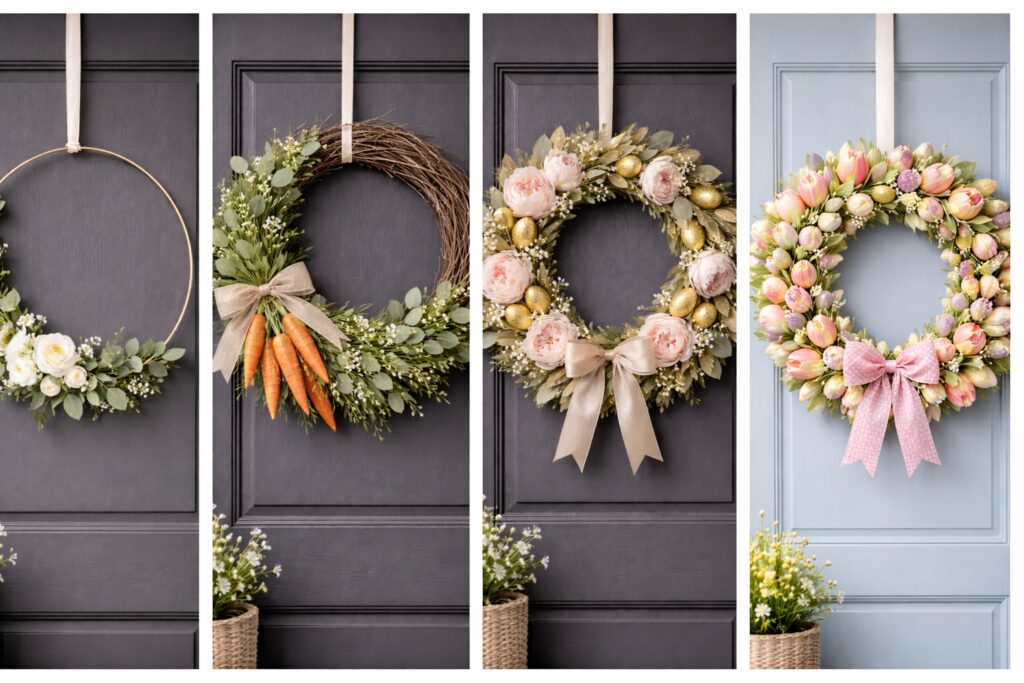
- 5 elegant DIY Easter wreath designs for your front door
- A full what you need list for each wreath
- Simple step by step instructions
- Styling tips to make your entryway feel cohesive
- Helpful product links so you can recreate the exact look
Whether you live in a house with a grand entrance or a cosy apartment with a small doorway, your front door deserves to feel styled with intention. Decorating your home is not about impressing anyone else. It is about creating an environment that reflects your taste, your creativity, and your independence.
Because choosing yourself includes choosing beautiful surroundings.
Ready to give your front door the soft, sophisticated Easter moment it deserves? Let’s start crafting. 🌸
1. Neutral Floral & Faux Egg Easter Wreath
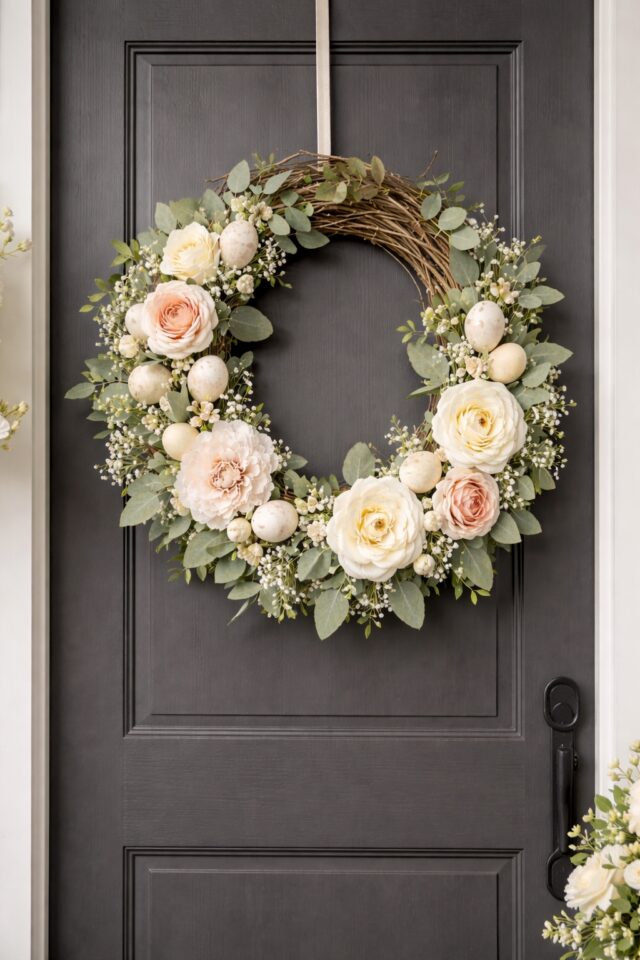
If your aesthetic leans soft, feminine, and quietly luxurious, this neutral floral Easter wreath is your girl. It feels seasonal without screaming Easter, which means it blends beautifully into an elegant home. Think cream florals, muted greenery, and delicate speckled eggs styled in a way that feels intentional, not cluttered.
This is the wreath you make when you want your front door to whisper chic.
What You’ll Need
- Grapevine wreath base
- Faux speckled Easter eggs
- Cream and blush faux flowers
- Artificial eucalyptus stems
- Hot glue gun
- Floral wire
Step-by-Step Instructions
Step 1: Create Your Greenery Base
Start by laying your eucalyptus stems around the grapevine wreath without gluing anything yet. This gives you a chance to see the shape and balance. Once you’re happy, secure the greenery with floral wire, wrapping it tightly around the base and tucking the ends underneath.
Step 2: Add Your Main Florals
Place your larger cream and blush flowers in small clusters rather than spacing them evenly. Clustering creates that elevated, designer look. Secure each stem with hot glue and, if needed, a little extra floral wire for stability.
Step 3: Incorporate the Faux Eggs
Tuck the speckled eggs gently between floral clusters. Keep them subtle. You want them peeking through, not dominating the design. Glue them carefully and hold in place for a few seconds until secure.
Step 4: Fill Any Gaps
Step back and look at your wreath from a distance. If you see empty spaces, tuck in small pieces of greenery to soften the edges and create fullness.
Step 5: Final Fluff and Shape
Adjust petals, bend greenery slightly outward for dimension, and make sure everything feels balanced. The magic is in the details.
Styling Tip
Hang this wreath with a soft champagne or blush ribbon for extra elegance. Pair it with a neutral doormat and a simple planter on one side of the door for that perfectly styled, intentional entrance.
This one is timeless enough that you will absolutely reuse it year after year. And we love decor that works smarter, not harder.
2. Elegant Pastel Tulip Easter Wreath
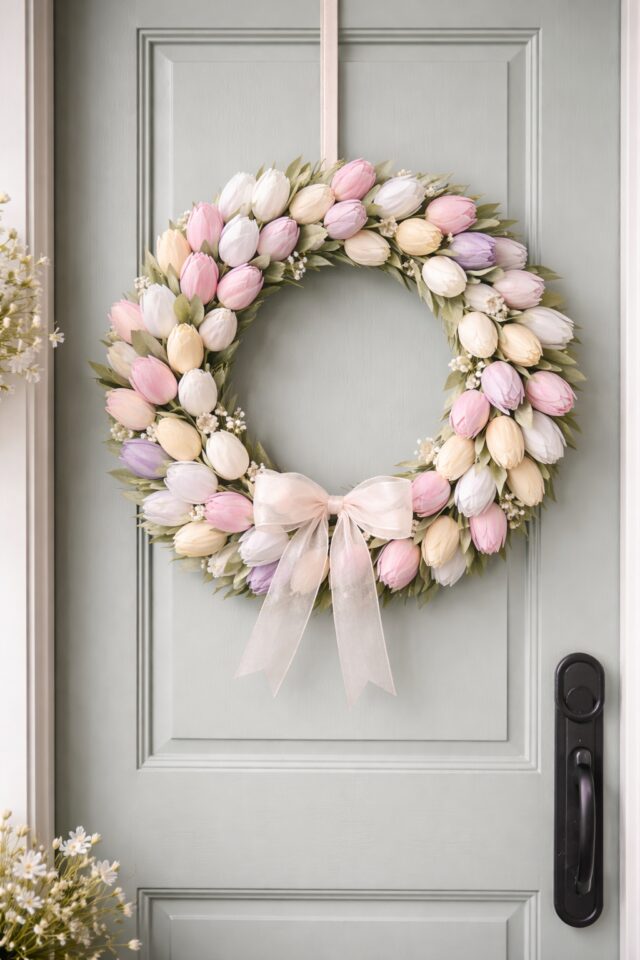
If you love soft colour but still want things to feel polished and elevated, this pastel tulip wreath is pure spring perfection. It is feminine, romantic, and fresh without feeling over the top. Think Parisian flower market meets Easter morning energy.
This one is ideal if you want something that feels bright and joyful while still aligned with an elegant, intentional home aesthetic. It is simple, symmetrical, and absolutely stunning on a white, sage, or pale blue front door.
What You’ll Need
Step-by-Step Instructions
Step 1: Trim and Prep Your Tulips
Using your wire cutters, trim the tulip stems so they are roughly the same length. You want them long enough to push securely into the foam base but not so long that they look uneven.
Step 2: Start Inserting at an Angle
Insert each tulip into the foam wreath at a slight angle, all facing the same direction. This creates a clean, professional finish rather than a messy, crowded look.
Step 3: Overlap for Fullness
Slightly overlap each stem as you go around the wreath. This makes the design feel lush and expensive, even though it is beautifully simple.
Step 4: Secure with Floral Pins
Once all tulips are in place, add floral pins discreetly between stems to secure everything firmly. This is especially important if your wreath will be exposed to outdoor movement.
Step 5: Create a Ribbon Detail
Tie a soft bow using your sheer ribbon and attach it at the bottom or top of the wreath depending on your preference. Keep it structured and neat for that elevated look.
Step 6: Adjust and Perfect
Step back and check for symmetry. Adjust spacing so the tulips feel balanced all the way around.
Styling Tip
Pair this wreath with a neutral coir doormat and a simple potted plant for a cohesive spring entrance. If you want to lean fully into seasonal elegance, repeat one of the pastel tones in a small porch cushion or planter detail.
This is the kind of wreath that makes your home feel styled on purpose. Soft. Confident. Completely you.
3. Minimalist White & Greenery Easter Hoop Wreath
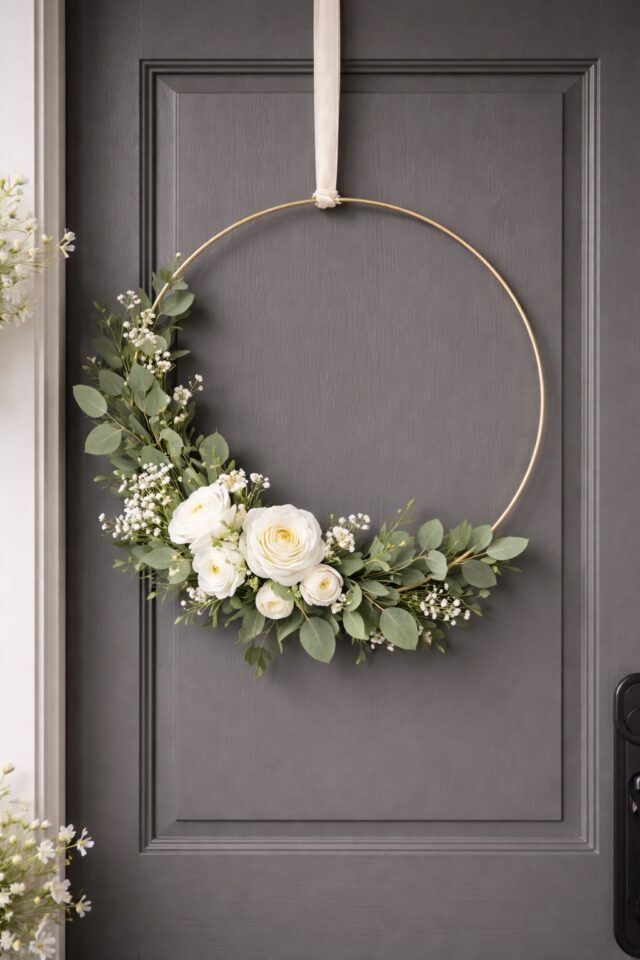
If your style leans modern, clean, and effortlessly put together, this minimalist hoop wreath is about to steal your heart. It is light, airy, and beautifully understated. No clutter. No chaos. Just fresh greenery and soft white florals arranged with intention.
This is the wreath you make when you want your front door to look styled, not seasonal overload. It feels elevated, timeless, and quietly confident.
What You’ll Need
- Metal hoop wreath frame
- Artificial greenery garland
- White faux flowers
- Natural twine
- Hot glue gun
- Wire cutters
Step-by-Step Instructions
Step 1: Wrap the Greenery
Take your greenery garland and begin wrapping it around one half of the metal hoop. Keep it slightly loose at first so you can adjust placement as you go.
Step 2: Secure with Twine
Use small pieces of twine to tie the greenery in place at several points along the hoop. Keep the knots at the back so they are hidden when hung.
Step 3: Create a Focal Floral Cluster
Using your wire cutters, trim your white faux flower stems to a manageable length. Arrange them in a small cluster toward one side of the greenery rather than spreading them evenly. This creates a more designer look.
Step 4: Glue and Reinforce
Once you are happy with the placement, secure the flowers with hot glue. Hold each stem in place for a few seconds to ensure it sets properly.
Step 5: Refine the Shape
Gently bend the greenery outward to add dimension and fullness. Step back and make sure the design feels balanced but not perfectly symmetrical. Slight asymmetry adds interest.
Step 6: Add a Hanging Detail
You can hang this wreath using twine, a simple white ribbon, or even a sleek black ribbon for contrast. Keep it minimal and clean.
Styling Tip
This wreath looks stunning on darker doors like charcoal, navy, or matte black. Pair it with a simple neutral doormat and a single potted plant for that effortlessly styled, modern entrance.
It is simple. It is chic. And it proves that less really can be more.
4. Farmhouse Carrot & Greenery Easter Wreath
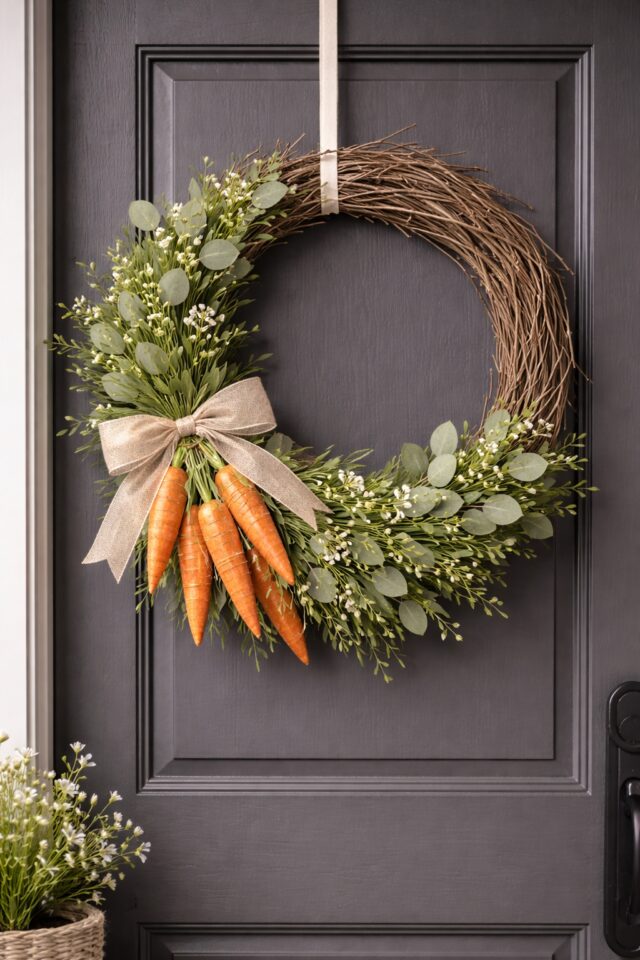
If you want something that feels playful but still pulled together, this carrot and greenery wreath is the perfect balance. It gives a subtle nod to Easter without looking like a children’s craft project. We are keeping it chic, structured, and just rustic enough to feel warm and inviting.
This one is ideal if you love natural textures and a slightly relaxed, countryside aesthetic, but still want your front door to look styled with intention.
What You’ll Need
- Grapevine wreath base
- Decorative faux carrots
- Artificial greenery picks
- Burlap ribbon
- Hot glue gun
- Floral wire
Step-by-Step Instructions
Step 1: Build Your Greenery Base
Start by attaching your greenery picks around the grapevine wreath. Layer them slightly in the same direction so the wreath feels cohesive rather than messy. Secure with floral wire first, then reinforce with hot glue where needed.
Step 2: Create a Carrot Cluster
Instead of spreading carrots evenly around the wreath, group them together on one side. This instantly elevates the look and makes it feel more styled. Overlap them slightly for depth.
Step 3: Secure Everything Firmly
Use floral wire to wrap around the carrot stems and wreath base. Add a small amount of hot glue underneath for extra security. Hold in place until set.
Step 4: Add a Burlap Bow
Tie a neat burlap bow and attach it near the carrot cluster. Keep the bow structured rather than oversized to maintain that polished finish.
Step 5: Adjust and Balance
Step back and check the overall shape. Add extra greenery to soften any gaps and make sure the weight of the design feels visually balanced.
Step 6: Let It Set Before Hanging
Allow the glue to fully dry before placing it on your door. This ensures everything stays secure once it is outdoors.
Styling Tip
Pair this wreath with a woven basket planter filled with simple greenery. A neutral doormat and a lantern nearby will give your entryway that warm, welcoming farmhouse feel without overdoing it.
It is festive. It is elegant. And it proves you can absolutely have a little fun while keeping things refined.
5. Luxe Blush & Gold Easter Wreath
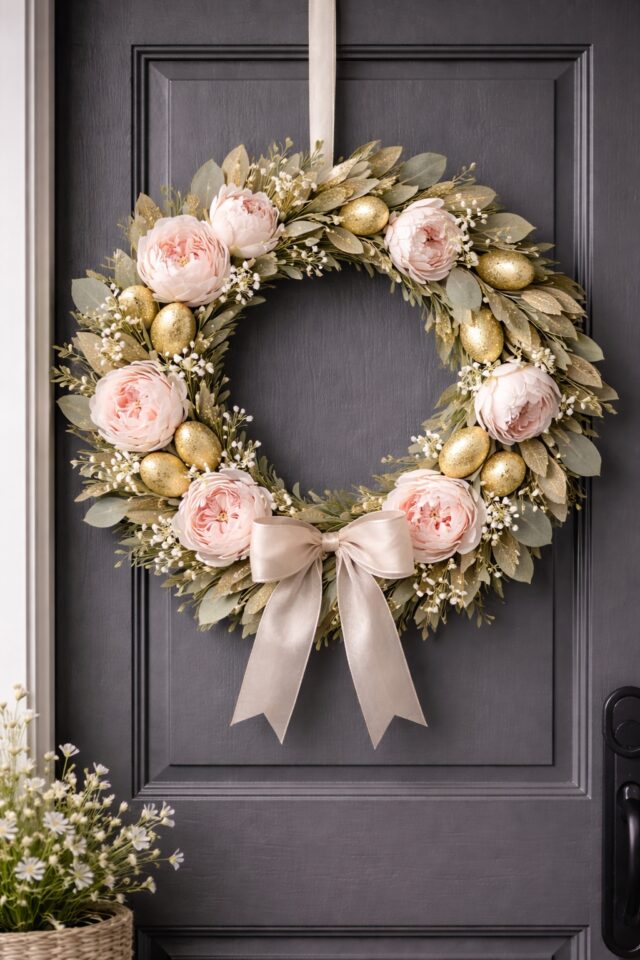
If you love soft glam and a touch of drama, this blush and gold wreath is your Easter moment. It is feminine, polished, and slightly elevated in a way that feels intentional rather than overdone. Think subtle shimmer, layered florals, and just enough metallic detail to catch the light beautifully.
This is the wreath you make when you want your front door to feel styled like a boutique hotel entrance. Refined. Confident. A little bit extra in the best possible way.
What You’ll Need
- Foam wreath base
- Blush faux peonies or roses
- Gold decorative leaves or gold faux eggs
- Champagne satin ribbon
- Floral wire
- Hot glue gun
- Wire cutters
Step-by-Step Instructions
Step 1: Build a Greenery Foundation
If your florals include greenery stems, start by spacing those around the foam base to create structure. Secure with floral wire first so you have a stable base.
Step 2: Add Blush Floral Clusters
Trim your blush peonies or roses using wire cutters. Place them in small clusters rather than evenly spacing them. This gives you that designer feel and avoids a flat look. Secure with hot glue and reinforce with wire if needed.
Step 3: Introduce Gold Accents
Insert gold leaves or faux gold eggs sparingly between the floral clusters. The key is subtle shine, not full sparkle overload. Tuck them slightly deeper into the wreath so they peek through.
Step 4: Secure and Reinforce
Double check that every element is firmly attached. Add additional glue where necessary and hold each piece until set.
Step 5: Shape and Add Dimension
Gently bend flower heads outward to create depth. You want layers and softness, not everything sitting on the same level.
Step 6: Finish with a Structured Ribbon
Tie a neat bow using champagne satin ribbon and attach it to the bottom or slightly off centre for a modern look. Keep the loops structured and smooth for that luxe finish.
Styling Tip
This wreath looks stunning against darker doors like navy, charcoal, or deep green. Pair it with gold hardware or a sleek lantern nearby to tie in the metallic accents.
It is elegant. It is confident. And it is the kind of Easter decor that feels completely grown and glamorous.
How to Hang Your Easter Wreath Without Damaging Your Door
You have created something beautiful. We are not ruining your paintwork now.
Hanging your wreath properly keeps it secure, prevents scratches, and makes sure it sits at the perfect height. Here are the easiest and most door friendly options.
1. Over the Door Wreath Hanger
How to use it:
- Simply slide the hanger over the top of your door
- Adjust the length if it is extendable
- Hook your wreath onto the bottom curve
This is the easiest method and requires zero tools. It is perfect if you like to swap wreaths seasonally.
2. Clear Command Hooks
How to use it:
- Clean the surface of your door thoroughly
- Apply the adhesive strip and press firmly
- Wait the recommended time before hanging your wreath
- Attach the wreath using ribbon or twine
These are ideal for glass or smooth painted doors and leave no residue when removed properly.
3. Magnetic Wreath Hanger
How to use it:
- Place one magnet on the inside of the door
- Align the second magnet on the outside
- Attach your wreath to the exterior hook
This works beautifully for metal doors and keeps everything sleek and minimal.
Pro Tip for Perfect Placement
Hang your wreath so the centre sits at eye level, usually around 57 to 60 inches from the ground. If your door has panels, centre it visually within the main panel rather than just measuring.
Because details matter. And your front door deserves to look styled on purpose.
How to Store Your Easter Wreath for Next Year
You made it. You styled it. You admired it every time you walked through the door.
Now let’s make sure it still looks just as good next spring.
Storing your wreath properly protects the shape, keeps florals from getting crushed, and saves you from having to remake it next year. We love decor that works twice as hard.
What You’ll Need
Step-by-Step Storage Instructions
Step 1: Clean Before Storing
Gently dust your wreath using a soft cloth or hairdryer on a cool, low setting. This removes debris and keeps florals looking fresh.
Step 2: Protect Delicate Details
Wrap any fragile florals, bows, or decorative eggs loosely in acid free tissue paper. Do not press tightly. You want protection, not compression.
Step 3: Place in a Structured Container
Store the wreath flat inside a wreath storage container. These are designed to keep the shape intact and prevent crushing.
If you do not have a structured box, place it inside a large clear storage bag and store it on a shelf where nothing heavy will rest on top.
Step 4: Store in a Cool, Dry Space
Avoid damp garages or hot loft spaces if possible. A cupboard or wardrobe shelf works beautifully.
Pro Tip
Label your storage container clearly with Easter or Spring Decor. Future you will be grateful when you are decorating next year.
Because elegant women plan ahead. And we are absolutely reusing this masterpiece.
Final Thoughts: Choose the Wreath That Feels Like You
There is no single right way to decorate for Easter.
Maybe you love soft neutrals and subtle eggs.
Maybe pastel tulips are your spring personality.
Maybe you are a blush and gold girl through and through.
The point is this. Your front door is the first impression of your home. It sets the tone before anyone even steps inside. And styling it intentionally is such a simple way to elevate your space without a full makeover.
Decorating is not about doing the most. It is about choosing details that reflect your taste, your energy, and your version of elegance.
So pick the wreath that makes you smile every time you walk up to your door. Order your supplies, put on your favourite playlist, and make an afternoon of it.
And when it is finished, step back and admire it properly. Because you created that.
If you loved these ideas, save this post to your Easter Decor or Spring DIY board so you can come back to it later. And if you recreate one, I would love to know which style you chose.
Your home. Your style. Your soft, confident spring moment. 🌸