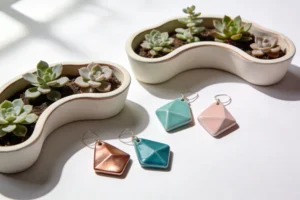
Statement jewelry that looks like it came from a cute little boutique but was actually made at your kitchen table? Yes please, we’re doing that.
These geo-glazed jewelry darlings are the kind of pieces that make people stop and ask where you got them… and you get to casually say you made them. Effortlessly cool, a little artsy, and completely custom to your style.
The best part is how doable this is. You don’t need a full craft room or hours of patience. With a bit of clay, a few tools, and a sprinkle of creativity, you can create bold, glossy pieces that feel polished enough for brunch, work, or that outfit you put on just to feel like her.
What makes these so addictive is the mix of clean geometric shapes and playful colour blocking. Think triangles, hexagons, and studs with just the right pop of glaze to catch the light. You can go soft and minimal or bold and statement, depending on your mood.
And once you make your first pair, don’t be surprised if you suddenly want a whole collection. Different colours, different finishes, maybe even matching sets. It’s giving creative therapy with a very cute end result.
Why You’ll Love This DIY
If you’ve ever wanted to dip your toe into making your own accessories without it turning into a whole production, this is your moment.
These pieces hit that sweet spot between easy and impressive. You’re not just making something cute, you’re making something you’ll actually reach for when getting dressed.
- They look way more expensive than they are
The clean lines and glossy finish give serious boutique vibes without the boutique price tag. - You can match your exact style
Neutrals, bold colour blocking, soft earthy tones… you’re in control of the aesthetic. - Beginner-friendly but still elevated
No complicated techniques here, but the end result feels polished and intentional. - Lightweight and comfortable
No heavy, dragging earrings. You’ll forget you’re even wearing them. - Perfect for gifting (or keeping, no judgement)
Handmade, personal, and honestly… a little addictive to make in batches. - Endless design options
Once you start playing with shapes and colours, the combinations just keep coming.
This is one of those DIYs where you finish and immediately think… okay wait, I need to make another pair.
What You’ll Need
You don’t need anything fancy to get started, which is exactly why this DIY is so addictive. Most of these are affordable basics you can reuse for future projects too.
- Polymer clay (multiple colours)
- Clay cutters or a craft knife
- Rolling pin or acrylic roller
- Baking tray and parchment paper
- Fine grit sandpaper
- Glaze or varnish (matte, gloss, or speckled)
- Jewelry findings (earring hooks, studs, chains)
- Jump rings and jewelry pliers
- Toothpick or needle tool
If you’re starting from scratch, don’t stress about getting everything perfect. Grab the basics, pick a couple of colours you love, and you’re already halfway to your first pair.
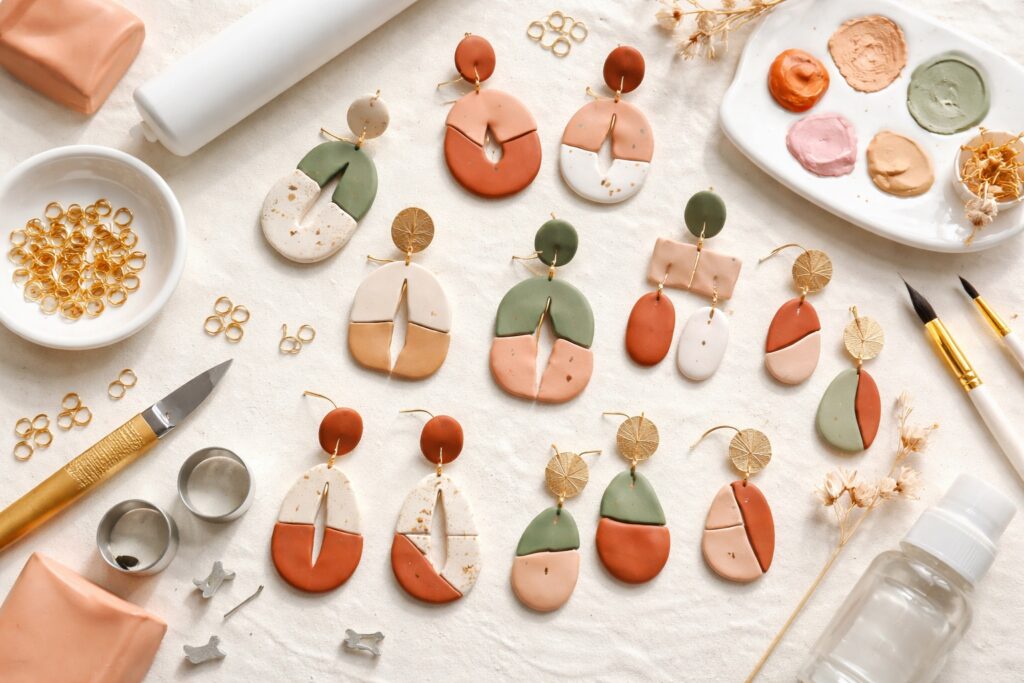
Step 1: Choose Your Shapes & Colour Combos
This is where the personality comes in, and honestly, it’s the most fun part.
Before you even touch the clay, take a minute to decide the vibe you’re going for. Do you want something bold and statement-making, or soft and minimal that goes with everything? There’s no wrong answer here, just your style.
Start with simple geometric shapes that are easy to work with but still look modern and elevated:
- Triangles for a clean, edgy look
- Circles or studs for something more subtle
- Hexagons if you’re feeling a little extra (in the best way)
- Half-and-half designs for that colour-blocked effect
When it comes to colours, less really is more if you want that polished finish. Stick to two or three shades per piece so everything feels intentional rather than chaotic.
You can go:
- Neutral with creams, taupes, and soft greys
- Earthy with terracotta, sage, and warm browns
- Bold with high-contrast combos like black and white or bright colour pops
If you’re unsure, lay your colours next to each other before you start. If they look good together on the table, they’ll look even better as jewelry.
This step sets the tone for everything that follows, so have a little play and trust your eye.
Step 2: Roll and Cut Your Clay
Now we get into the hands-on part, and this is where it starts to feel very satisfying very quickly.
Take your clay and soften it slightly in your hands so it’s easier to work with. Then roll it out using your roller until it’s nice and even. You’re aiming for around 3 to 5mm thick, which gives you that perfect balance between sturdy and lightweight.
Once it’s rolled out, it’s time to cut your shapes.
- Press your cutters firmly into the clay for clean edges
- If you’re using a knife, go slow and steady to keep lines sharp
- Lift shapes gently to avoid stretching or warping
If the edges aren’t perfect, don’t stress. You can smooth them lightly with your fingers now, and we’ll refine everything later with sanding.
This is also a good moment to think ahead. If you’re making matching pieces or a pair of earrings, try to keep your shapes similar in size so everything looks balanced when worn.
It might feel simple, but this step is what gives your jewelry that crisp, modern look. Clean cuts here make everything else look more polished later.
Step 3: Create That Signature Geo Look
This is where your pieces go from cute to seriously eye-catching.
Instead of leaving your shapes as one solid colour, you’re going to break them up and play with contrast. This is what gives that modern, geometric, slightly artsy feel that looks way more high-end than it should.
Start by slicing your shapes into sections:
- Cut diagonally for a bold, angular look
- Try uneven splits for something a bit more organic
- Mix small and large sections for visual interest
Now swap pieces between different colours. Press them together gently so they form one new shape with that colour-blocked effect.
Once everything is in place:
- Smooth the seams lightly with your fingers
- Press just enough to hold everything together without distorting the shape
- Check the edges are still clean and defined
If it’s not perfect, don’t panic. A little imperfection actually adds to that handmade charm, and we’ll refine things later.
This is the step where your creativity really shows. You can keep it minimal with just two tones or go bold with contrast. Either way, it’s giving statement piece energy without the effort.
Step 4: Add Holes for Jewelry Assembly
This step is quick, but do not skip it because there is no coming back once your clay is baked.
Before your pieces go into the oven, you need to create the holes that will hold your jewelry together. This is what allows you to attach hooks, jump rings, or chains later.
Use your toothpick or needle tool to gently make holes where needed:
- At the top of earrings for hooks or studs
- Between sections if you’re creating dangle designs
- Centered and evenly spaced for a clean, balanced look
A couple of things to keep in mind:
- Don’t push too hard or you’ll distort the shape
- Make the hole slightly bigger than you think you need, as it can shrink a little when baking
- Keep placement consistent if you’re making a pair
Take a second to double-check everything before moving on. Once these are baked, what you see is what you get.
It’s a small step, but it’s what turns your clay shapes into actual, wearable pieces.
Step 5: Bake to Perfection
Time to turn your designs into actual, wearable pieces.
Carefully place your clay shapes onto your lined baking tray, making sure they’re not touching. Give them a little space so they bake evenly and keep their shape.
Then it’s into the oven.
- Follow the temperature and timing on your clay packaging
- Bake in small batches for more consistent results
- Keep an eye on them towards the end so they don’t overbake
Once they’re done, resist the urge to touch them straight away. They’ll still be soft when hot and can easily bend or lose their shape.
Let them cool completely on the tray. As they cool, they’ll harden into that solid, durable finish you want.
If you notice any slight imperfections, don’t stress. That’s exactly what the next step is for.
Step 6: Sand for a Smooth Finish
This is the step that takes your pieces from homemade to “wait, you made those?”
Once your clay has fully cooled, grab your fine grit sandpaper and gently smooth out the edges. This is especially important for earrings, because anything rough will not feel cute after a few hours of wear.
Focus on:
- Edges and corners that feel sharp
- Any uneven lines or slight bumps
- Areas where colours were joined together
Use light pressure and take your time. You’re refining, not reshaping.
After sanding:
- Wipe away any dust with a soft cloth
- Check the surface feels smooth to the touch
- Make sure holes are still clear and not blocked
It might feel like a small detail, but this is what makes your jewelry comfortable, polished, and actually wearable all day without irritation.
Basically, this is your secret weapon step.
Step 7: Glaze for That Glossy Glow
This is where everything levels up and starts looking seriously polished.
Once your pieces are smooth and dust-free, it’s time to add your glaze. This is what gives that shiny, finished look that makes your jewelry feel store-bought in the best way.
Using a small brush, apply a thin, even layer of glaze:
- Work in light coats rather than one thick layer
- Make sure you cover the surface evenly
- Avoid letting glaze pool around the edges or holes
Then let it dry completely before deciding if you want a second coat.
Your finish choice sets the vibe:
- Gloss for that bold, eye-catching shine
- Matte for a softer, more understated look
- Speckled or textured for something a little different
If you want that extra-smooth finish, lightly sand between coats and reapply. It’s a small step that makes a big difference.
Once dry, your pieces will look brighter, richer in colour, and instantly more elevated. This is the moment they go from DIY to “where did you buy those?” energy.
Step 8: Assemble Your Jewelry
This is the final step where everything comes together and your pieces officially become wearable.
Once your glaze is completely dry, it’s time to attach your jewelry findings. This part is easier than it looks and makes a huge difference in how polished your pieces feel.
Start by opening your jump rings using your pliers:
- Twist them open sideways rather than pulling apart
- Attach your clay piece to the earring hook, stud, or chain
- Close the jump ring securely so there are no gaps
If you’re creating dangle earrings:
- Connect multiple pieces using jump rings
- Make sure everything hangs evenly
- Check the movement feels natural when held up
For studs:
- Glue the backing onto the flat side of your piece
- Let it dry fully before wearing
Take a second to check everything is secure and aligned. Nothing ruins the vibe faster than a wonky earring.
And just like that, you’ve gone from a block of clay to jewelry you’ll actually wear out. Honestly, this is the part where you start planning your next pair.
Styling Ideas: How to Wear Your Pieces
You didn’t just make jewelry for it to sit in a drawer. These pieces deserve to be seen.
The beauty of geo-glazed designs is how versatile they are. They can dress up a simple outfit or add personality to something already styled. It’s all about how you pair them.
Here are a few easy ways to wear them:
- Let them be the statement
Pair bold shapes with a simple outfit like a white shirt and jeans. Let your earrings do the talking. - Match your colour palette
Choose pieces that tie into your outfit tones for that effortlessly put-together look. - Stack and layer
Mix your handmade studs with other earrings if you have multiple piercings. It adds dimension without trying too hard. - Go minimal with neutrals
Soft tones and matte finishes work beautifully for everyday wear and feel quietly elevated. - Pull your hair back
A bun, ponytail, or tucked-behind-the-ear moment lets your pieces actually shine. - Style for your mood
Bold and contrast-heavy when you’re feeling confident, softer tones when you want something more understated.
These are the kind of accessories that make an outfit feel finished without any extra effort. And knowing you made them just makes it better.
Pro Tips for That Boutique Finish
If you want your pieces to look like they belong in a curated little shop instead of your kitchen table, this is where the magic happens.
These small tweaks make a big difference in how polished your final pieces feel.
- Keep your thickness consistent
Uneven clay can make pieces look a bit off. Roll evenly so everything feels balanced and professional. - Don’t overcrowd your design
It’s tempting to use all the colours, but restraint is what makes it look elevated. Two or three tones is your sweet spot. - Test your glaze first
Try it on a scrap piece to check the finish before committing. Some glazes dry differently than expected. - Clean edges are everything
Take your time cutting and sanding. Crisp lines instantly make your jewelry look higher-end. - Work in small batches
It’s easier to control quality and avoid mistakes when you’re not rushing through loads at once. - Store pieces flat while drying
This stops glaze from pooling or creating uneven finishes. - Check symmetry for pairs
Earrings don’t need to be identical, but they should feel balanced when worn.
These are the little details that take your pieces from cute DIY to “wait… you could actually sell these.”
Common Mistakes to Avoid
This DIY is beginner-friendly, but there are a few little things that can trip you up if you’re not paying attention. The good news is they’re all easy to fix once you know what to look for.
- Rolling the clay unevenly
If one side is thicker than the other, your pieces can look slightly off and feel heavier than they should. - Cutting messy shapes
Rushed cuts lead to wobbly edges. Take your time here because clean shapes make everything look more polished. - Skipping the sanding step
It might seem optional, but it’s really not. Rough edges will feel uncomfortable and instantly give DIY vibes. - Forgetting to add holes before baking
This one hurts. Once it’s baked, you can’t easily fix it, so always double-check before it goes in the oven. - Overbaking the clay
Too much time or heat can dull colours or cause slight warping. Stick to the instructions. - Applying glaze too thickly
Thick layers can look uneven or streaky. Thin, even coats are the way to go. - Not checking alignment when assembling
A slightly crooked jump ring can throw off the whole look, so take a second to adjust everything.
Avoid these, and your pieces will instantly look more refined, comfortable, and wearable.
Make It Your Own

This is where you stop following steps and start creating pieces that feel completely you.
Once you’ve got the basics down, there’s so much room to play. You’re not limited to one style or finish, and honestly, that’s what makes this DIY so addictive.
Try experimenting with:
- Marbled effects
Gently blend two or more colours for a soft, swirled look that feels a little more artistic. - Gold leaf or metallic accents
Add tiny touches for that elevated, slightly luxe finish. - Asymmetrical designs
Let one earring be slightly different from the other for a modern, editorial vibe. - Layered pieces
Stack shapes together for movement and dimension. - Seasonal colour palettes
Soft pastels for spring, warm tones for autumn, bold shades for summer. - Matching sets
Create earrings and a necklace that tie together for a complete look.
This is your chance to create pieces that no one else has. Play around, trust your eye, and don’t be afraid to try something a little different.
Sometimes the best designs come from not overthinking it.
Conclusion
And just like that, you’ve created jewelry that looks polished, personal, and honestly a little bit impressive.
What started as a few simple tools and some clay has turned into pieces you can actually wear out, style with your outfits, and show off with confidence. Not bad for an afternoon project.
The best part is how easy it is to keep going. New colours, new shapes, different finishes… once you’ve made one pair, you’ll already be thinking about the next. It’s giving creative hobby with a very cute payoff.
So whether you’re making these for yourself, gifting them, or low-key considering turning this into a little side hustle moment, you’ve now got everything you need to make it happen.
Now go wear your creations like you didn’t just casually make them yourself.
FAQs
Got questions before you dive in? I’ve got you. Here are the ones that usually come up (and the answers that will save you a little trial and error).
What type of clay is best for jewelry?
Polymer clay is your best option. It’s lightweight, easy to work with, and bakes hard enough to hold its shape without feeling heavy on your ears.
How do I stop my earrings from feeling heavy?
Keep your clay rolled to around 3 to 5mm thick and avoid making pieces too large. Polymer clay is naturally lightweight, so as long as you don’t overdo the size, you’re good.
Do I have to use glaze?
No, but it definitely levels up the finish. Without glaze, your pieces will look more matte and natural. With glaze, they’ll look more polished and vibrant.
Why did my clay crack or burn?
This usually comes down to oven temperature or baking time. Always follow the instructions on your clay packaging and avoid overheating. An oven thermometer can help if your oven runs hot.
Can I make these without special tools?
Yes. You can use a knife instead of cutters and a regular rolling pin instead of an acrylic one. The results might be slightly less precise, but still totally wearable and cute.
How long does the whole process take?
You can easily make a pair in an afternoon. Including baking and drying time, expect around 2 to 3 hours from start to finish.
Can I shower or swim while wearing them?
It’s best not to. Water and prolonged moisture can affect the glaze and metal findings over time. Treat them like your favourite accessories and they’ll last longer.
How do I store my jewelry?
Keep them in a dry place, ideally in a small box or pouch so they don’t get scratched. Store them flat if possible to protect the finish.
If you’re still unsure about anything, just start. This is one of those DIYs where you learn as you go and somehow end up with something cute anyway.